Containerization is operating system virtualization technology used to isolate and package an application and the dependencies required to run the application into a standardized unit called container. Historically, application portability from one environment to another used to be a great challenge. Containerization addresses this problem by bundling an application and its dependencies including application code, runtime, system tools, system libraries and configurations into a lightweight, standalone, executable package of software called Container Image. This helps developers and IT professionals deploy applications seamlessly across different environments and reduce the overall lifecycle of software from development to production.
From technical perspective, a container virtualizes the underlying Operating System and make the containerized app assume that it has the required OS—including CPU, memory, file storage, and network connections available for use. Because the differences in underlying OS and infrastructure are abstracted, as long as the base image is consistent, the container can be deployed and run anywhere. Containers can run on physical hardware, in the cloud, on VMs, and across multiple distributions of the same operating systems.
In this blog, I shall cover following topics to help you understand key concepts about Docker Images, Docker Containers, Docker Hub, Azure Container Registry (ACR) and Azure Container Instances and explain step by step process to deploy these services:
- Why to Use Containers?
- What is Docker?
- Docker Architecture
- What is Docker Hub?
- Docker Objects
- Azure Container Instance (ACI)
- Step By Step Tutorial to Create Docker Container Locally & Deploy it to Azure Container Instance
- Build Container Image from DockerFile
- Create & Run the Container
- Create Azure Container Registry (ACR)
- Deploy Container Application to Azure Container Instance
- Conclusion
Why To Use Containers
There are so many benefits of containerization which has made it the de facto choice for application development and deployment
1. Agility
Standardization of containers has streamlined the development and testing cycle of applications and reduced the overall effort to deploy them
2. Portability
With standardized packaging format, portability of apps between different OS platform distributions, environments and cloud providers is no more a challenge
3. Scalability
The lightweight nature of containers enable rapid scalability
What is Docker?
Docker is an open source containerization platform used to develop, ship, and run containers. Unlike virtual machines, Docker doesn’t use a hypervisor and you can run Docker on your desktop as well.
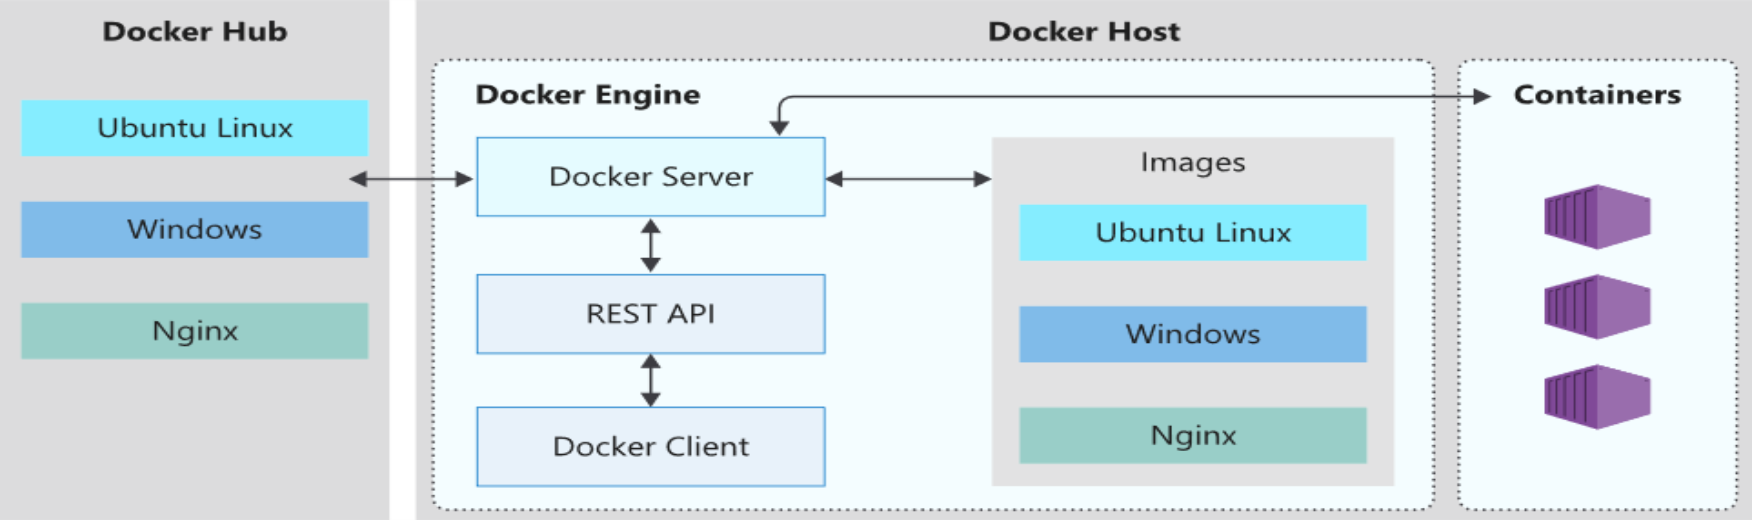
Docker Architecture
Docker uses a client-server architecture. The Docker client talks to the Docker daemon, which does the heavy lifting of building, running, and distributing your Docker containers. The Docker client and daemon can run on the same system, or you can connect a Docker client to a remote Docker daemon.
Docker Server / Daemon
The Docker server or Docker daemon (dockerd) listens for Docker API requests and manages Docker objects such as images, containers, networks, and volumes. It is responsible for managing the lifecycle of our containers.
Docker client
There are two types of Docker clients: A command-line application named docker, or a Graphical User Interface (GUI) based application called Docker Desktop. Both the CLI and Docker Desktop interact with the Docker daemon using a REST API, over UNIX sockets or a network interface.
Docker Desktop
Docker Desktop is an easy-to-install application for Mac, Windows or Linux environment that enables you to build and share containerized applications. Docker Desktop includes the Docker daemon (dockerd), the Docker client (docker), Docker Compose, Docker Content Trust, Kubernetes, and Credential Helper.
What is Docker Hub (Docker Registry)?
Docker Hub is a repository used to store and distribute Docker images. Docker Hub is Docker’s default public registry for storing & retrieving images.
Docker objects
When you use Docker, you are creating and using images, containers, networks, volumes, plugins, and other objects. Following is an overview of two of the most important Docker objects.
Docker Images
A Docker image is a read-only template with instructions for creating a Docker container. It packages everything needed to run an application: files, binaries, libraries, dependencies, configuration, and metadata like the default command and environment variables. Often, an image is based on another image, with some additional customization.
You might create your own images or you might only use those created by others and published in a registry. To build your own image, you create a Dockerfile with a simple syntax for defining the steps needed to create the image and run it. Images are immutable – once built, an image can’t be modified; changes are made by creating a new image or adding layers on top of existing image. An image is composed of layers with each instruction in Dockerfile corresponding to a layer in the image.
Docker Containers
A Docker container is a runnable instance of an image. You can create, start, stop, move, or delete a container using the Docker Desktop or CLI. You can access your application once container is running. You can connect a container to one or more networks, attach storage to it, or even create a new image based on its current state. By default, a container is isolated from other containers and its host machine. When a container is removed, any changes to its state that aren’t stored in persistent storage disappear. So, to preserve app state or data, attach persistent storage to your container.
What is Azure Container Instance (ACI)
Considering inherent benefits of containerization, containers are becoming the preferred way for cloud applications as well. Azure Container Instances is Microsoft Azure’s solution to run Linux or Windows containers in Azure without having to manage any virtual machine.
Step By Step Tutorial to Create Docker Container Locally & Deploy it to Azure Container Instance
In this tutorial, we shall be packaging a simple Node.js application into a container image and then run the application on Azure Cloud using Azure Container Instances (ACI) service
We need to download application code from Github, create an Image from the code and create a local container from that image to test that the container is working successfully in local environment. Then, we need to create an Azure Container Registry and push the image to that registry. An Azure Container Instance will be created based on that uploaded image. Following are the detailed step by step instructions:
Setting up Environment
Instructions in this tutorial are based on Windows 10 machine. To use docker containers on windows, you need to install following software:
- WSL 2 (Windows Subsystem for Linux)
WSL is an open source tool that allows you to use Linux environment on your Windows machine without the need for a separate virtual machine. The Windows Subsystem for Linux (WSL) lets developers install a Linux distribution (such as Ubuntu, OpenSUSE, Debian etc) and use Linux applications, utilities, and Bash command-line tools directly on Windows. WSL 2 requires Windows 10 or higher. Use following command in windows terminal to install WSL 2.
wsl —install
- Docker Desktop
Download Docker Desktop. Follow instructions to complete installation. Make sure to Use WSL 2 instead of Hyper-V option on the Configuration page. Start Docker Desktop from start menu.
- VS Code – IDE for Azure CLI
Get Application Code from Github
- Open VS Code and start a new terminal from view menu

- Open the desired directory where you want to clone the application code from github. I am using D:\Docker-Tutorial directory

- Clone aci-helloworld application code from Azure Github repository. Validate that repository has been cloned on local machine


Build Container Image from DockerFile
- Change directory to the recently downloaded aci-helloworld directory. You shall be able to spot dockerfile inside the directory

- Open Dockerfile within the terminal. Observe the content of Dockerfile

A DockerFile is a text document that contains all the commands a user would call on CLI to build an image. It includes instructions related to base image to build from (FROM), copy app files into the image (COPY), create new directory (RUN MKDIR), set working directory (WORKDIR), install dependencies (RUN npm INSTALL), default command when the container starts (CMD). In this tutorial, we are building image from official Node.js image which is based on Alpine Linux distro. - Use docker build command to create an image named aci-helloworld-image.
-t switch is used to tag / name the image
dot at the end of the command refers to current directory, the directory containing Dockerfile
- Use docker images command to view all the available images. You should see the newly created aci-helloworld-image. You can view the newly created image in Docker Desktop app as well by clicking Images in the left panel


Create & Run the Container Locally
- Before deploying container to Azure environment, use docker run command to create and run the container locally and confirm that it is working.
-d switch lets the container run in background (detach mode) without occupying terminal. It prints the container ID
-p switch is used to publish container port 80 (on which app listens) to host port 8080 (port on your local machine). So any traffic directed towards http://host:8080 is forwarded to port 80 inside the container
aci-helloworld-image is the name of the image you just created
- View newly created container using docker container ls command. You can view this container in Docker Desktop app as well by clicking Containers in the left panel

- Now go to http://localhost:8080 in your browser to verify that the containerized app is working. You should see below webpage


Create Azure Container Registry (ACR)
In this step, you will create an Azure Container Registry which is private Docker registry in Azure. You will push the image to Azure Container Registry for use with ACI. Before executing below steps, make sure that you are logged into your Azure subscription.
- Create a new resource group named rg-ACI-Tutorial. Verify that resource group is created

- Create an Azure Container Registry named containerregistry212. The container registry name must be unique within Azure and contains alphanumeric characters. Verify that ACR is created

- Sign in to ACR before pushing image to it

- Get the name of login server for your registry

- Next, tag the aci-helloworld-image with the login server of your container registry. Also, add :v1 tag to the end of the image name to indicate the image version number. Before pushing an image to Azure registry, it is must to tag it with full login server of the registry

- Now push the tagged image to your private registry containerregistry212. Verify that the image is successfully pushed. It will be available as a repository service in ACR


Deploy Container Application to Azure Container Instance
In order to deploy an image to a private container registry like containerregistry212, you must supply credentials to access the registry. For this purpose, the best practice is to create a Microsoft Entra ID Service Principal account with pull permissions to the registry. Service Principals govern how an application can access resources in a specific tenant using permissions and role assignments.
Create a New Service Principal
You need to open a bash terminal to execute below commands. Click on the + icon in top right corner of the terminal window then ubuntu (WSL). A new bash terminal will open up.
- Define two environment variables named ACR and Service_Principal. Assign a name to Service Principal. Also define another variable named ACR_ID and assign your Azure Container Registry ID to it. Truncate any carriage return that might be added by Windows

- Define two more variables for storing username and password of the service principal. Create a new role-based-access-control service principal scoped to the registry with pull only permissions. Assign password of this service principal to variable PASSWORD using –query “password” named parameter. Assign username of the service principal to variable USER_NAME using –query named parameter by querying ‘appid’ of the Azure Active Directory Service Principal account. Use echo command to verify that both variables are assigned values.

- Once you create a service principal, you will have a new app registration entry in Microsoft Entra ID App Registrations. This represents the global definition of the application within Microsoft Entra ID

- Creating a service principal will also create an entry in Microsoft Entra ID Enterprise Apps. This represents the actual service principal instance of the application with role, permission & policies definition for the SP


Deploy Container
Once you have an image in your private Azure registry and a service principal with pull permissions to the registry, you can proceed with deploying a container.
- Use Azure Container Create command to create a new container. Specify below parameters:
–resource-group Name of the resource group to put your container in
–name Name of the container
–image Image to build the container from
–registry-login-server Login Server of the registry containing image
–registry-username Username of the service principal with pull access right to the registry
–registry-password Password of the service principal with pull access right to the registry
–ip-address Should be public IP address for reachability over the internet
–dns-name-label Unique name within Azure that would constitute FQDN of the app
–ports Port on which application listens
- Verify that deployment has succeeded, and the container is running

- You can visit Azure portal as well to see your container’s status
- Get the container’s fully qualified domain name (FQDN) to view application in browser

- Open browser and navigate to the FQDN of your container. You will see the application running


Conclusion
Containerization is the go to technology for modern application development, testing and deployment. Containerization overcomes the challenge of portability across OS distributions and environments and is highly scalable at the same time. Azure Cloud Instances (ACI) is Microsoft Azure’s solution to deploying cloud based instances of docker containers. The ease of deployment and abstraction of underlying infrastructure management makes Azure Container Instances a great choice.