
As rightly said by Heraclitus ‘Change is the only constant’. Today’s development landscape truly resonates with this aphorism. With the adoption of Cloud and Agile software development methodologies arise the need to deploy and configure underlying infrastructure in an equally efficient and speedy manner. This is where Infrastructure as Code comes in handy.
Azure Resource Manager Template is a tool to manage Infrastructure as code on Microsoft Azure Cloud. Infrastructure as code allows you to specify, through code, the infrastructure that you need for your application e.g. VMs, Storage, Database, Network etc. With infrastructure as code, you can maintain both application as well as all other dependencies required to deploy application in a central code repository.
There are three different ways through which you can deploy Azure Resource Manager Templates.
- First method is to deploy a Local ARM Template.
- Second method is making use of Linked ARM Templates
- Third method is to use CI/CD tool Azure Pipelines
In this beginner-friendly article, I shall walk you through following key concepts to learn how to create, deploy and manage infrastructure with Local Azure Resource Manager Templates:
- What is Azure Resource Manager Template
- Main Advantages of ARM Templates
- Structure of an ARM Template
- Tools Needed to Write an ARM Template
- How to Write an ARM Template: Example – Create a Storage Account Using ARM Template
- Adding Parameters to ARM Template
- Best Practices of Adding Parameters to ARM Template
- Adding Variables to ARM Template
- Best Practices of Adding Variables to ARM Template
- Adding Ouput to ARM Template
- How to Deploy an ARM Template
- Deploy the Template to Azure
- Template Deployment Result
- Conclusion
What is Azure Resource Manager (ARM) Template
Azure Resource Manager template is a JavaScript Object Notation (JSON) file that defines infrastructure and its configuration required for deployment of resources needed by an application.
For context, JSON is a lightweight text-based data-interchange format commonly used for transferring data between a server and a web application.
Main Advantages of ARM Templates
As a tool to deploy Infrastructure as Code, same as BICEP and Terraform, following are the main advantages of ARM Templates:
- Declarative Syntax
ARM templates use declarative syntax (not Imperative syntax) for writing Infrastructure code. This means that instead of worrying about sequence of programming steps you only need to declare what you intend to deploy.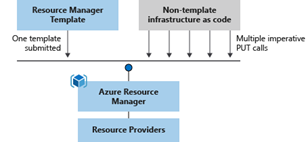
- Idempotent Deployment
ARM templates are idempotent. This means that you can repeat deployment of the same template multiple times and get the same result. Both resource type as well as its state remain intact. If you deploy a template wherein a resource is being deployed and that resource with specified properties already exists, no changes are made to the resource or its state.
- Parallel Deployment
Azure Resource Manager is the deployment and management service for Azure and is responsible for orchestrating the deployment of resources so that inter-dependent resources are created in correct order. It also ensures that, when possible, resources are created in parallel thus expediting the deployment process.
- Modular Infrastructure Code Management
You can break your infrastructure code into smaller, more manageable & re-usable modules either ‘linked’ with each other or ‘nested’ within each other to deploy complete solution.
- CI / CD Integration
ARM templates can be integrated into CI / CD tools like GitHub Actions or Azure Pipelines to automate software release pipeline for rapid infrastructure changes.
In addition to aforementioned benefits, ARM templates help you add scripts to your templates, test it using ARM template toolkit (arm-ttk) for recommended guidelines and preview changes before actual resource deployment using what-if operation.
Structure of an ARM Template
ARM template file is made up of different sections, each dedicated to a peculiar functionality. Following are the elements that constitute an ARM template:
| Section Name | Type | Description |
|---|---|---|
| schema | mandatory | This section defines location of the JSON schema file that describes the structure of JSON data. Schemas are used to author and validate ARM templates. Version number used depends on scope of deployment and JSON editor. |
| contentVersion | mandatory | This section defines version of your template. You can version your template to keep track of significant changes for re-using templates |
| apiProfile | optional | This section defines collection of API versions for resource types. You can use this element to avoid having to specify API version for each resource in the template |
| parameters | optional | This section defines values that are provided during deployment of template for deploying the same template for different environments e.g. Prod, Dev etc. |
| variables | optional | This section defines values that are used as placeholder for complex expressions used within the template for re-using them later in the template |
| functions | optional | This section defines customized User-defined functions to simplify the template. |
| resources | mandatory | This section defines actual items that you want to deploy to Azure cloud e.g. VM, Storage or Network etc. |
| output | optional | This section defines values that are returned as an output after the deployment of ARM template |
Tools Needed to Write an ARM Template
To author an ARM template, use Microsoft Visual Studio Code (a source code editor) with ARM Tools extension. ARM Tools extension provides rich development features including IntelliSense (code completion, parameters tracking, options listing), code snippets, syntax validation, template navigation, in-line help and many more.
You also need either Azure CLI or Azure Powershell module to deploy ARM template.
VS Code can be downloaded from https://code.visualstudio.com/download while ARM Tools extension can be downloaded from Extensions Marketplace within VS Code or https://marketplace.visualstudio.com/items?itemName=msazurermtools.azurerm-vscode-tools . Azure CLI and Azure Powershell module can also be downloaded from Extensions Marketplace within VS Code.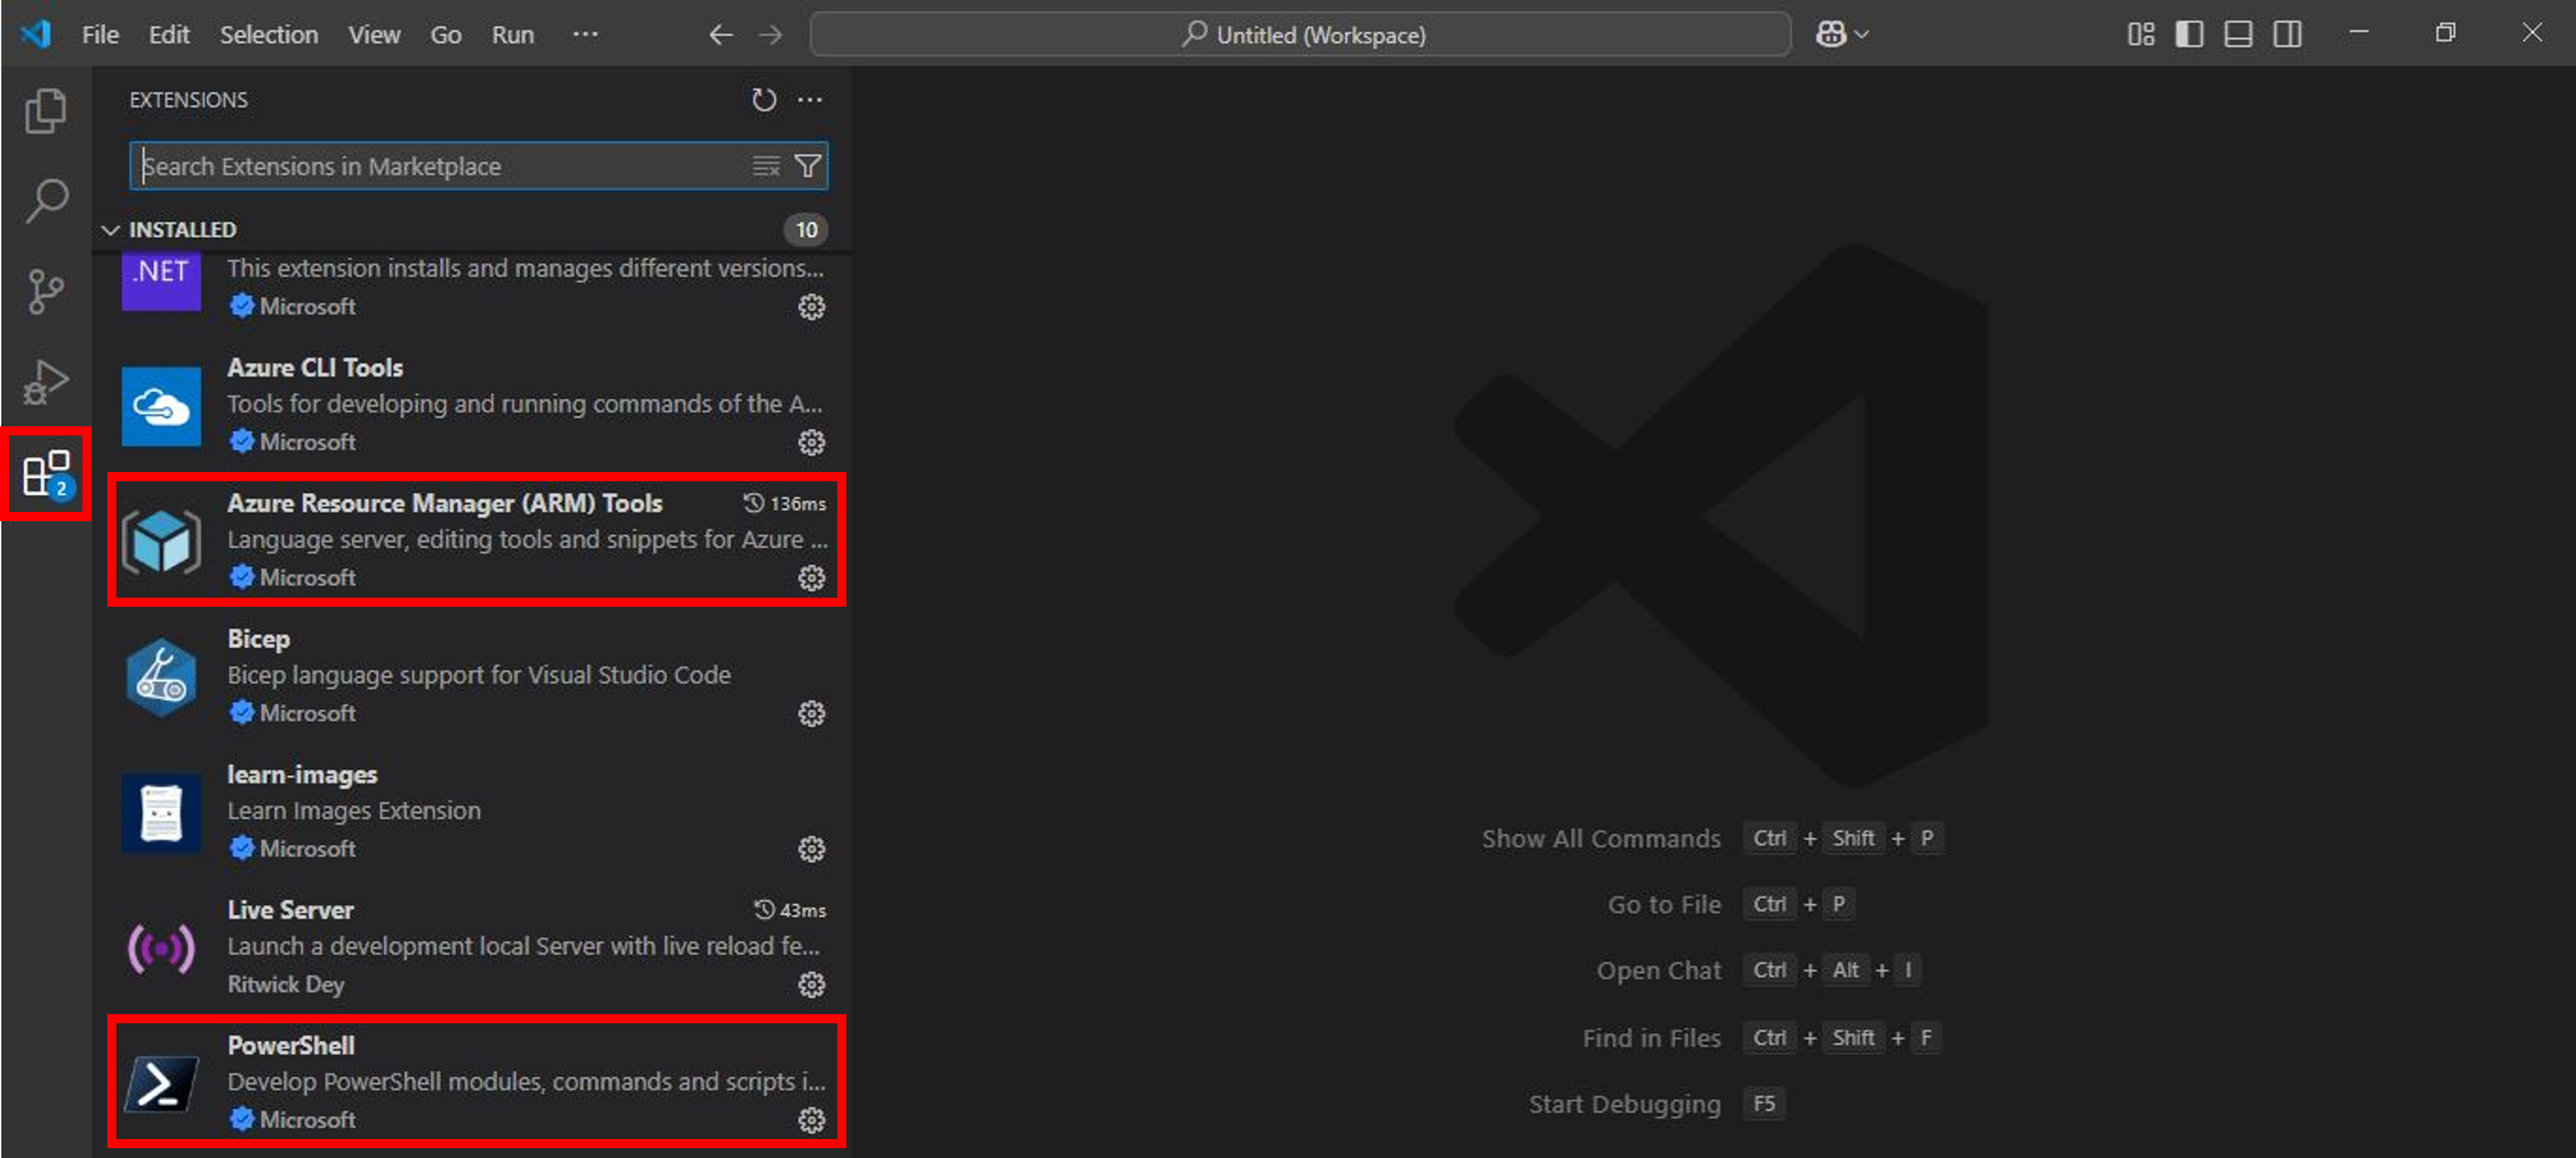
How to Write an ARM Template: Example – Create a Storage Account Using ARM Template
Let’s take an example of creating a Storage Account. We shall make use of Parameters, Variables, Resources and Output section to elaborate how to write an ARM template for deploying a Storage Account.
- Create a new folder on your computer for saving ARM template files. I have created D:\AZ-Tutorial in my case.
- Now open VS Code -> Open Folder from File Menu -> Select D:\AZ-Tutorial. This will select AZ-Tutorial folder as your Workspace where you could save all your JSON files for this project.
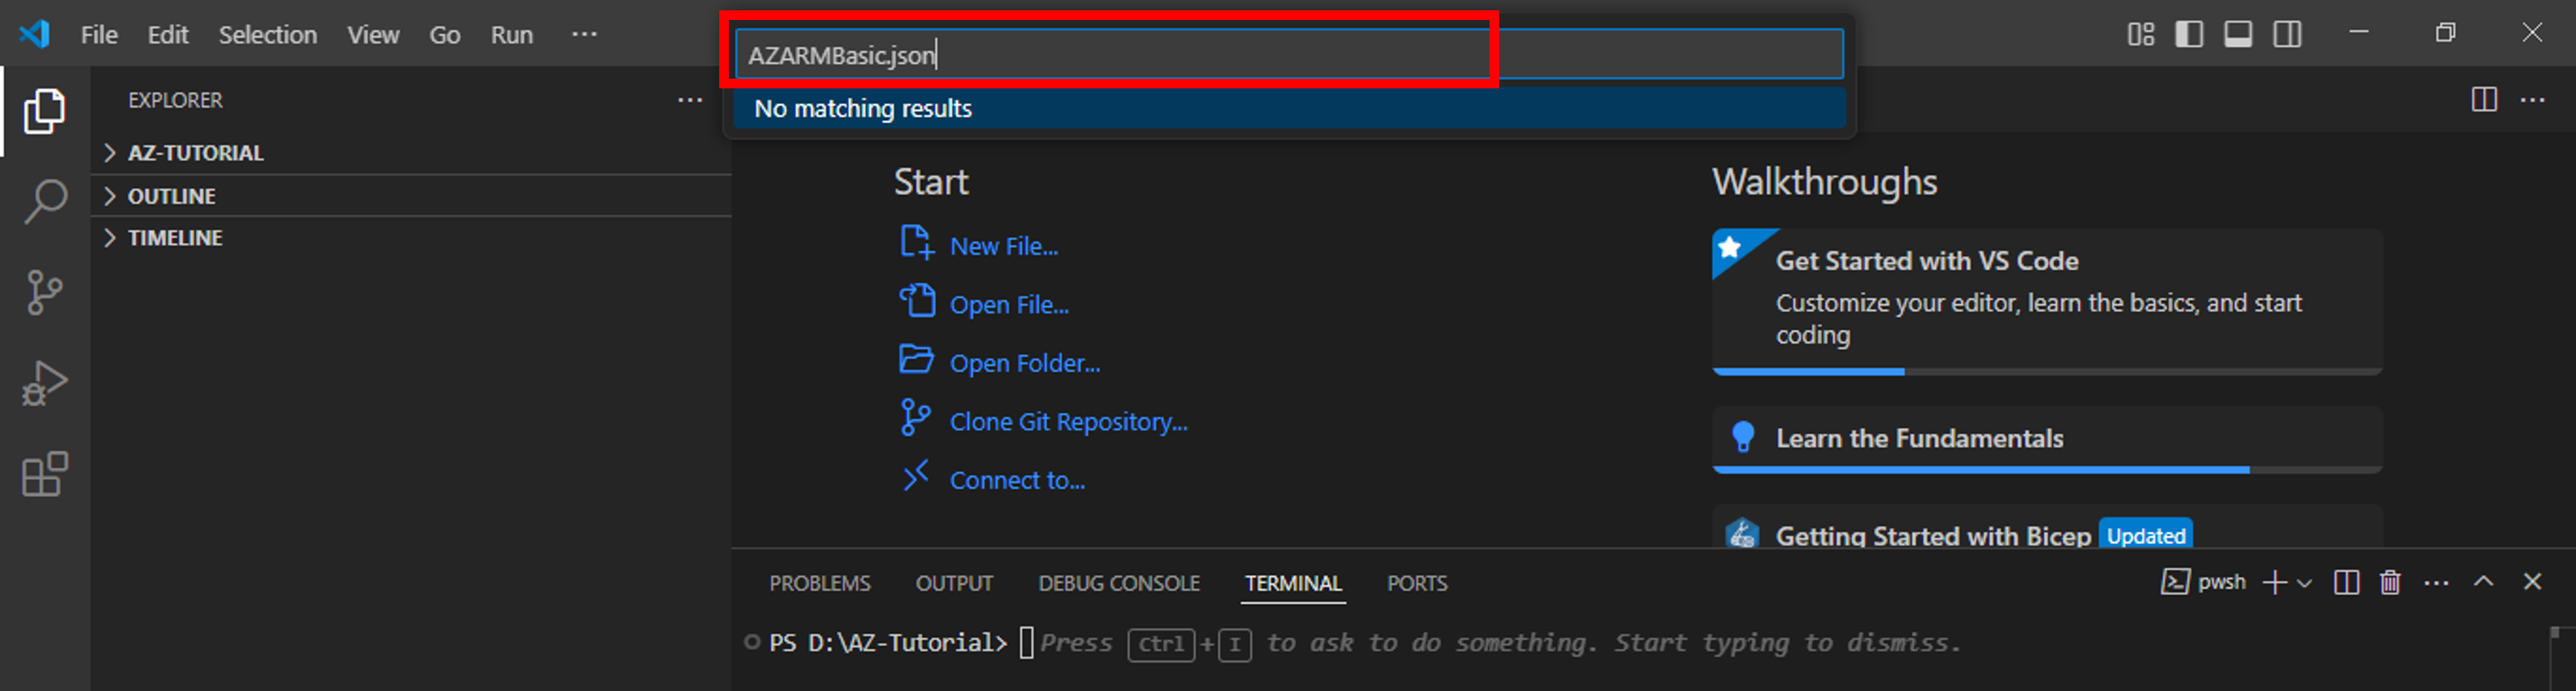
- Open New File from File Menu and name it as AZARMBasic.json. Press Enter -> Create File. This will create a blank JSON file with the mentioned name.

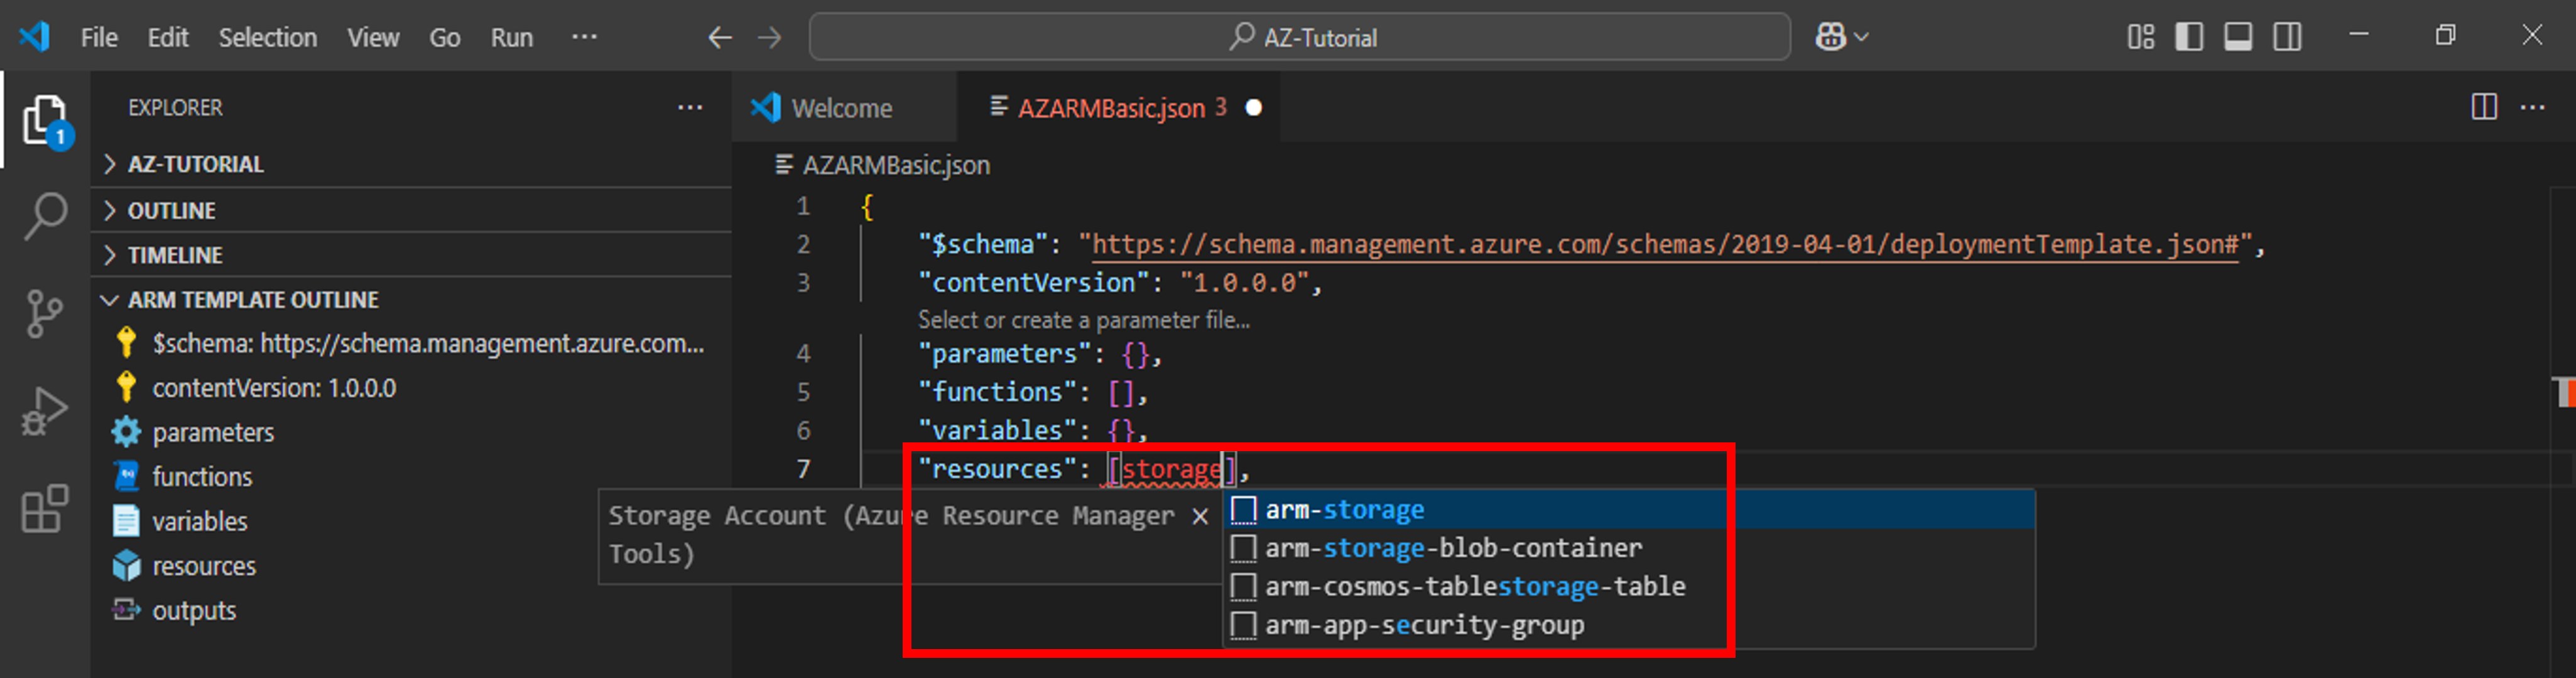
- Type arm into the code editor. This shows code snippet for scaffolding out a complete ARM template. Select arm!.

- A blank template shall be created for Resource Group Deployment scope. For context, a template can be created for Management Group, Subscription & Tenant scope as well.

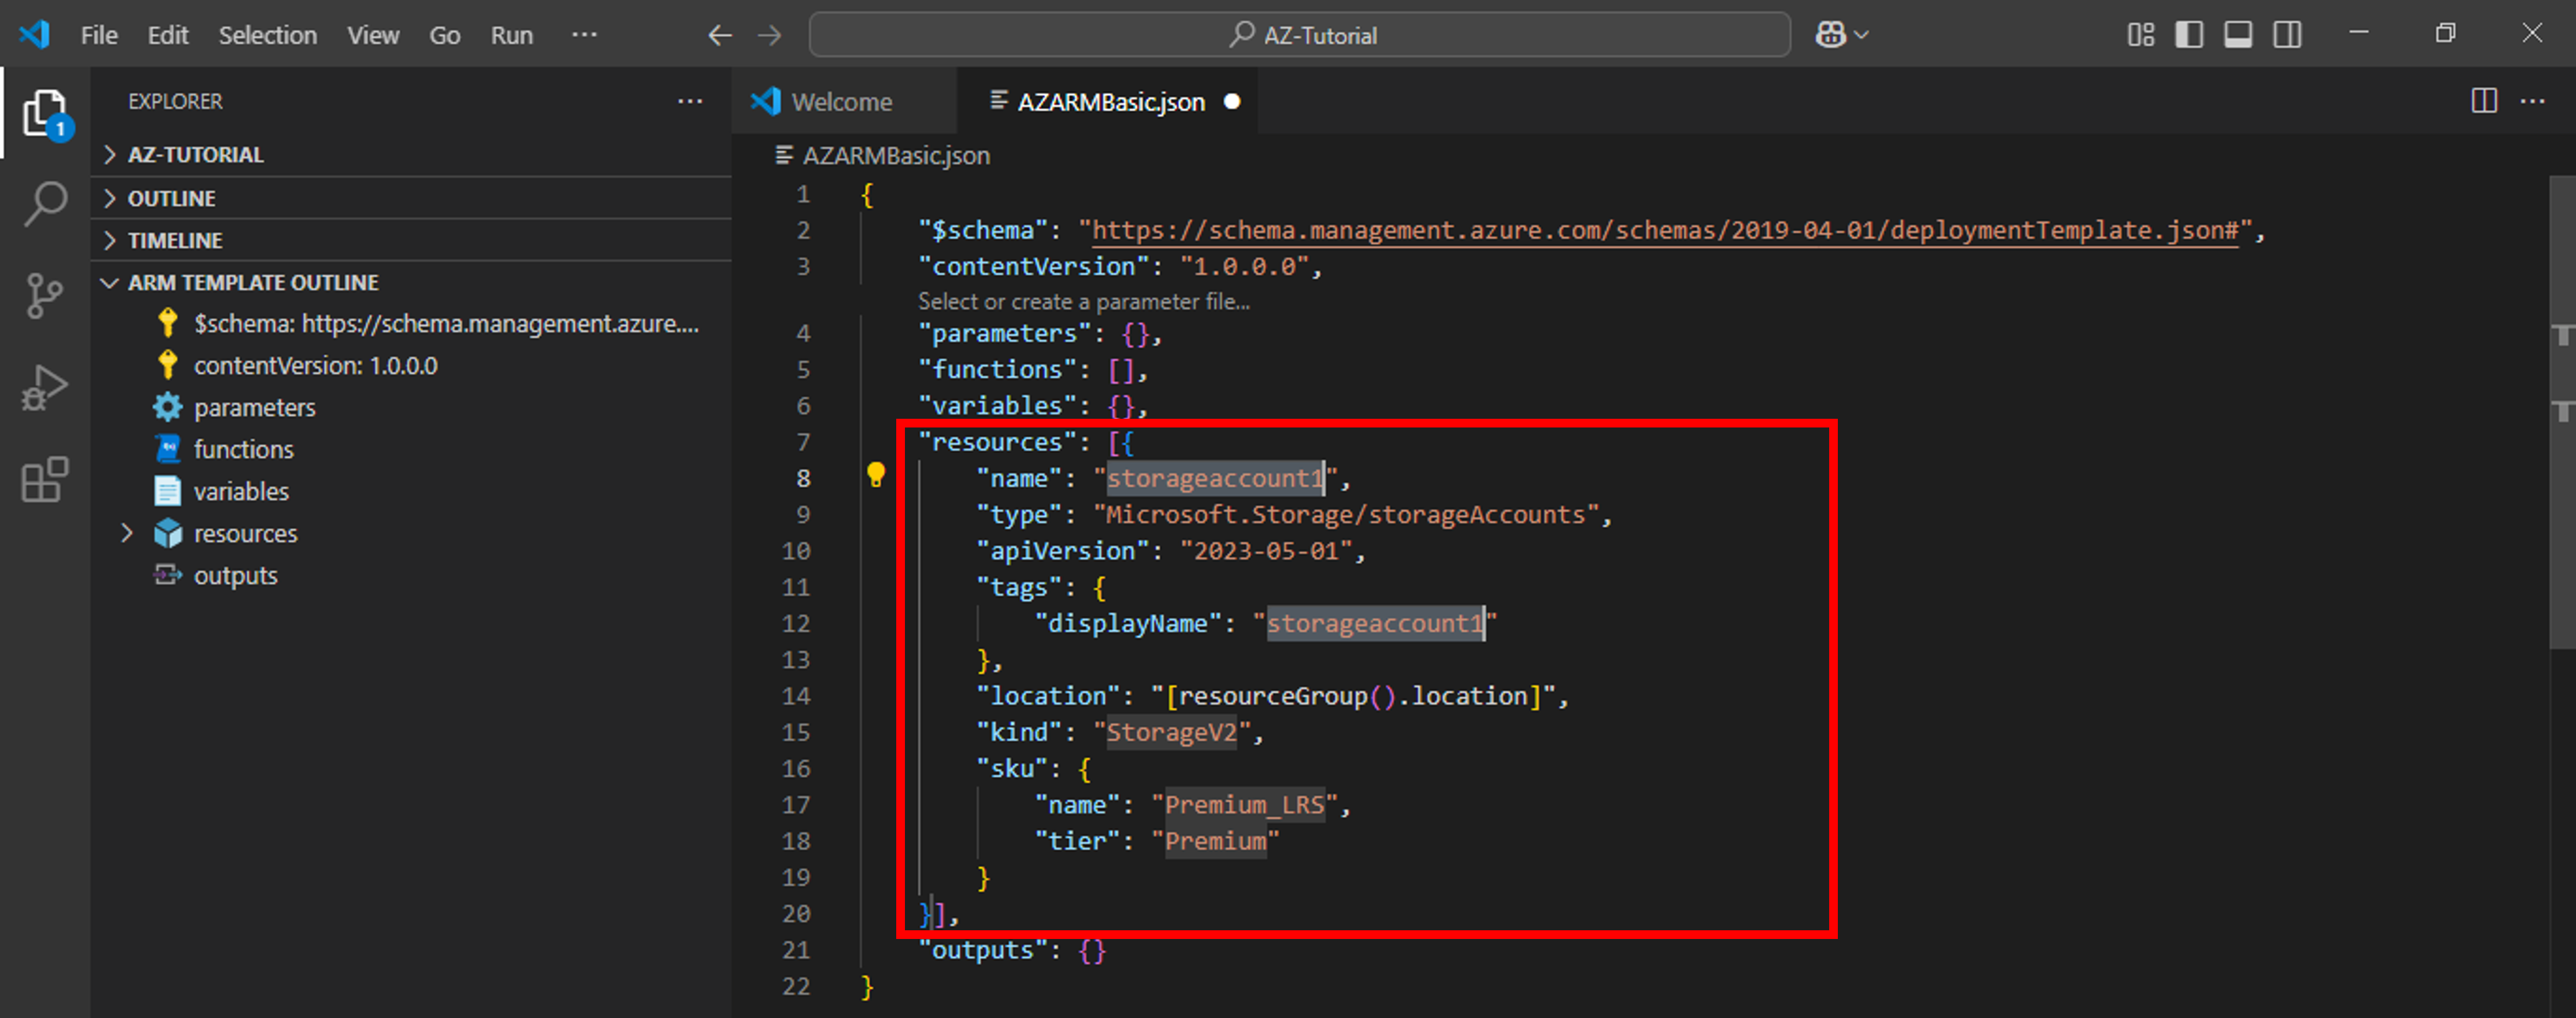
- Now we need to create Storage resource. Place your cursor in the template resources block, type storage, and select arm-storage snippet

- A new storage resource with default properties shall be added to the template


Adding Parameters to ARM Template
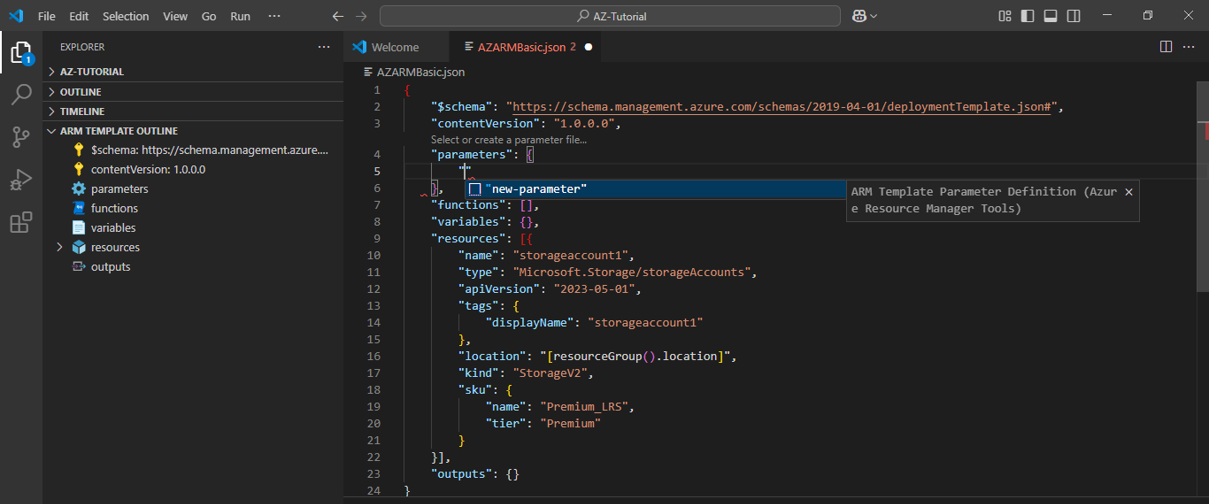
- Let’s assume that we shall be requiring different Storage SKU for different deployments, so we need to define parameter for storage “sku” property. In order to define a new parameter, place your cursor in the parameters block, press Enter, type “, and then select the new-parameter snippet. A new parameter ‘parameter-1’ with generic properties shall be added to the template


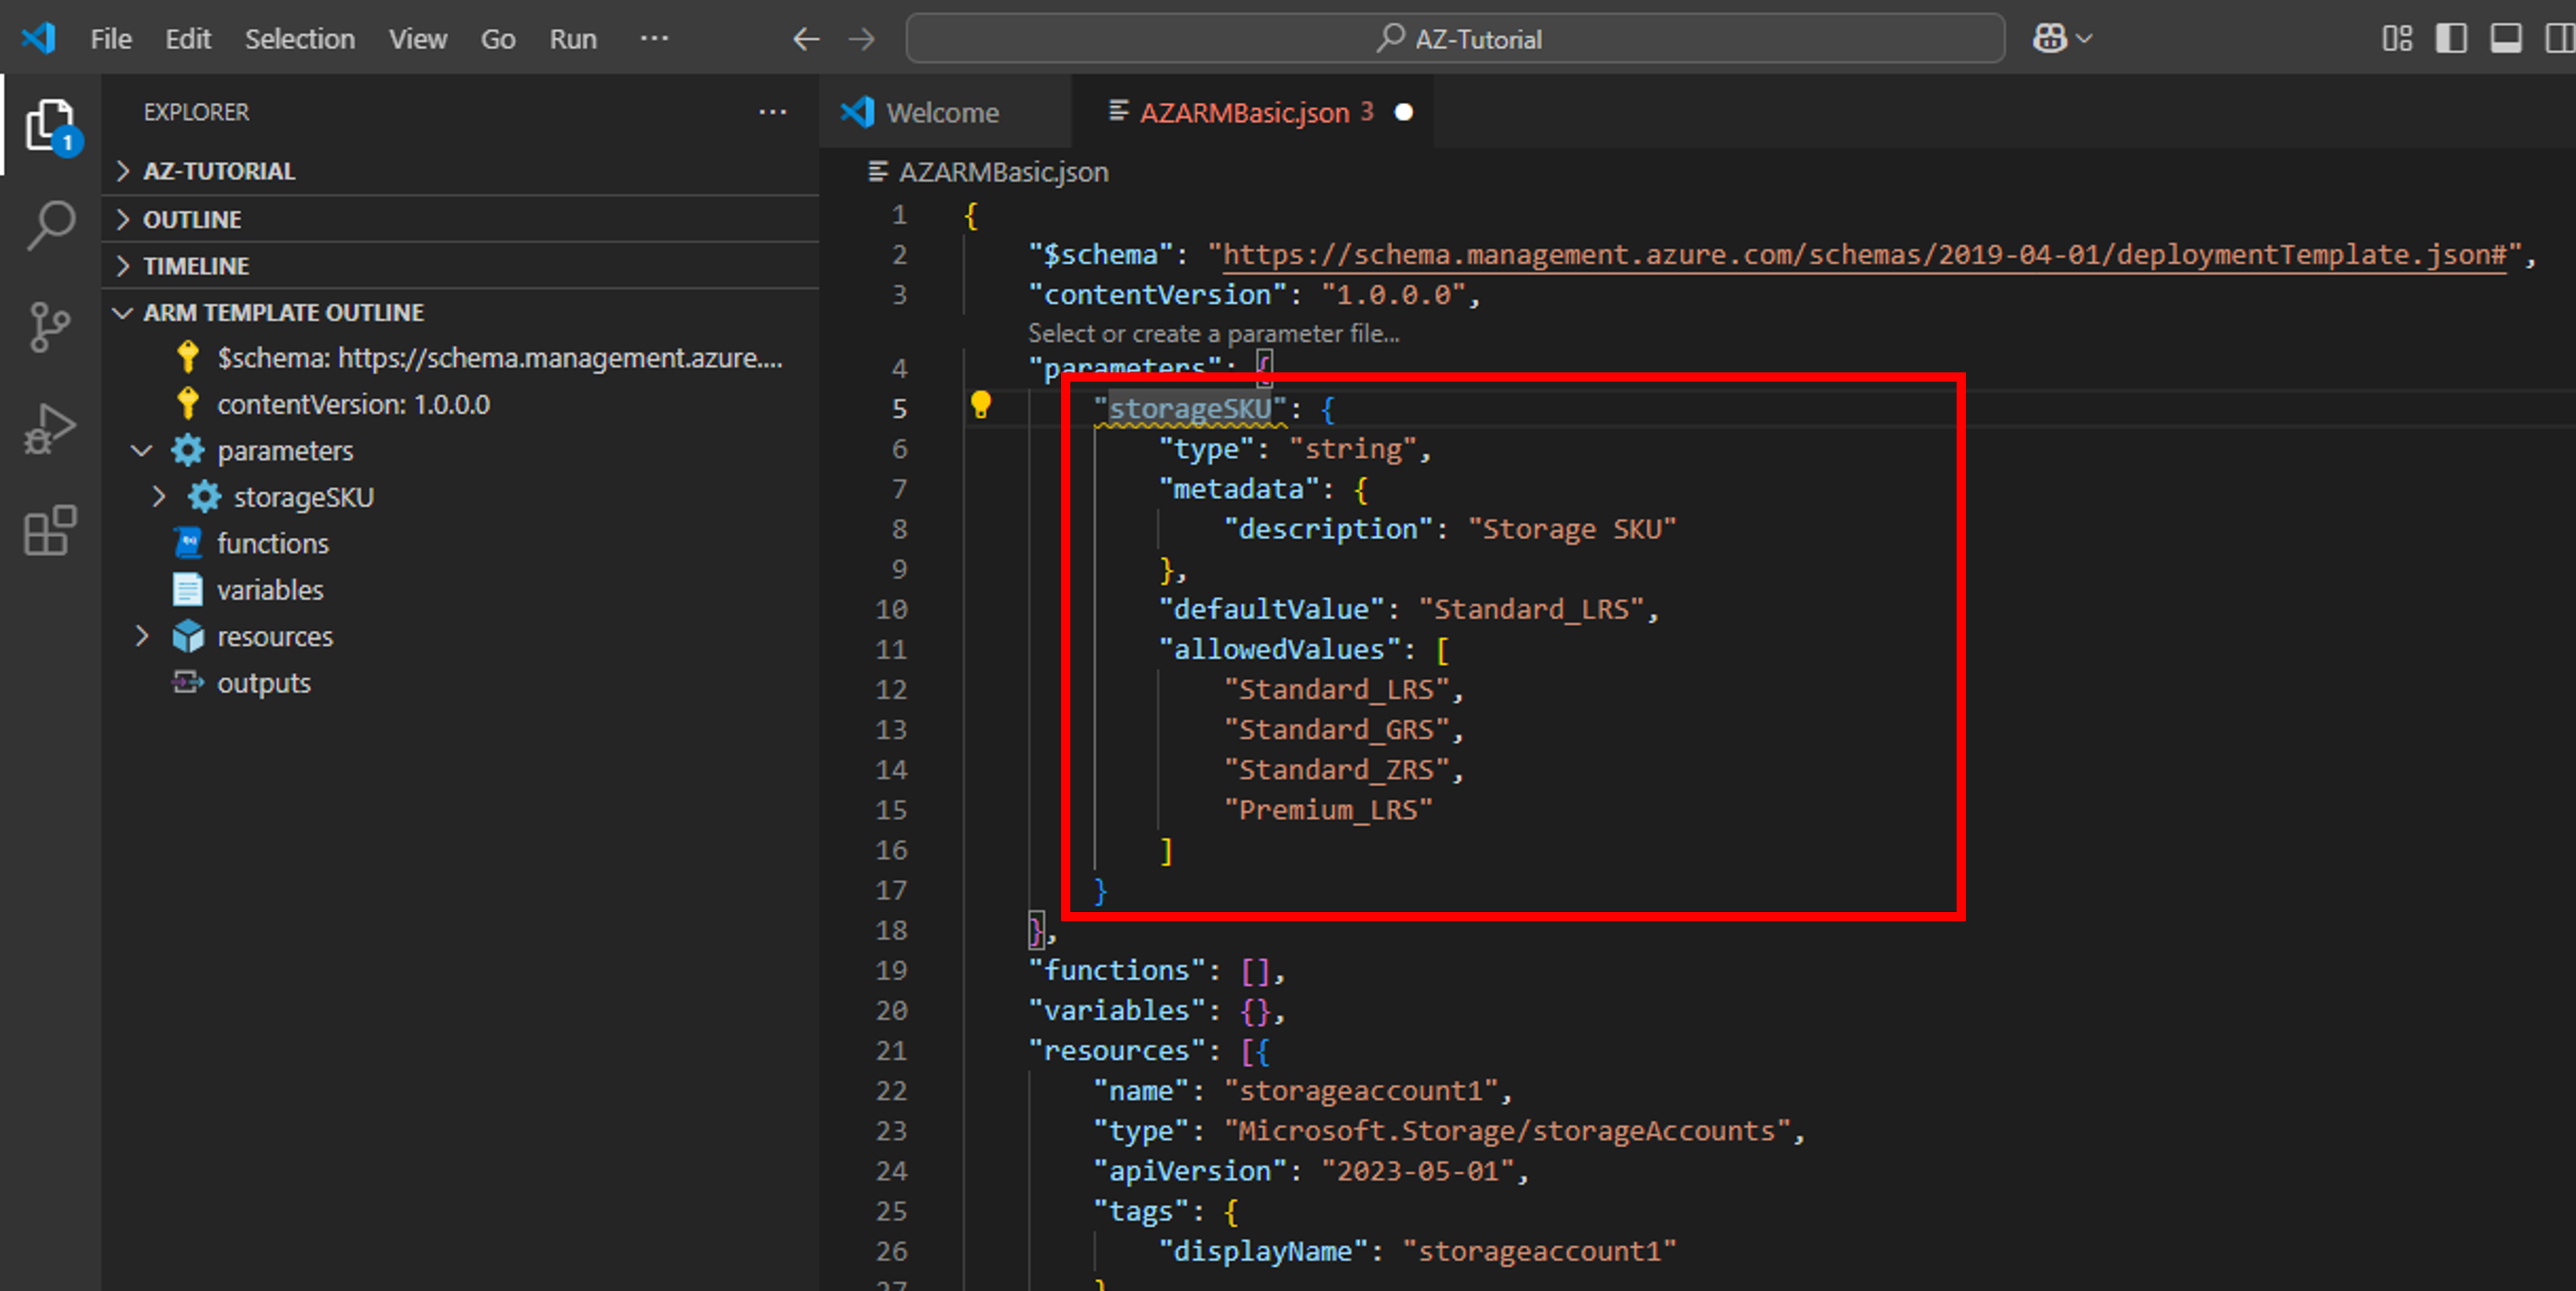
- Change the name of parameter1 to “storageSKU“. Also, change description to “Storage SKU“. In parameter’s properties section, update “defaultValue” and “allowedValues” as depicted in the snap below.

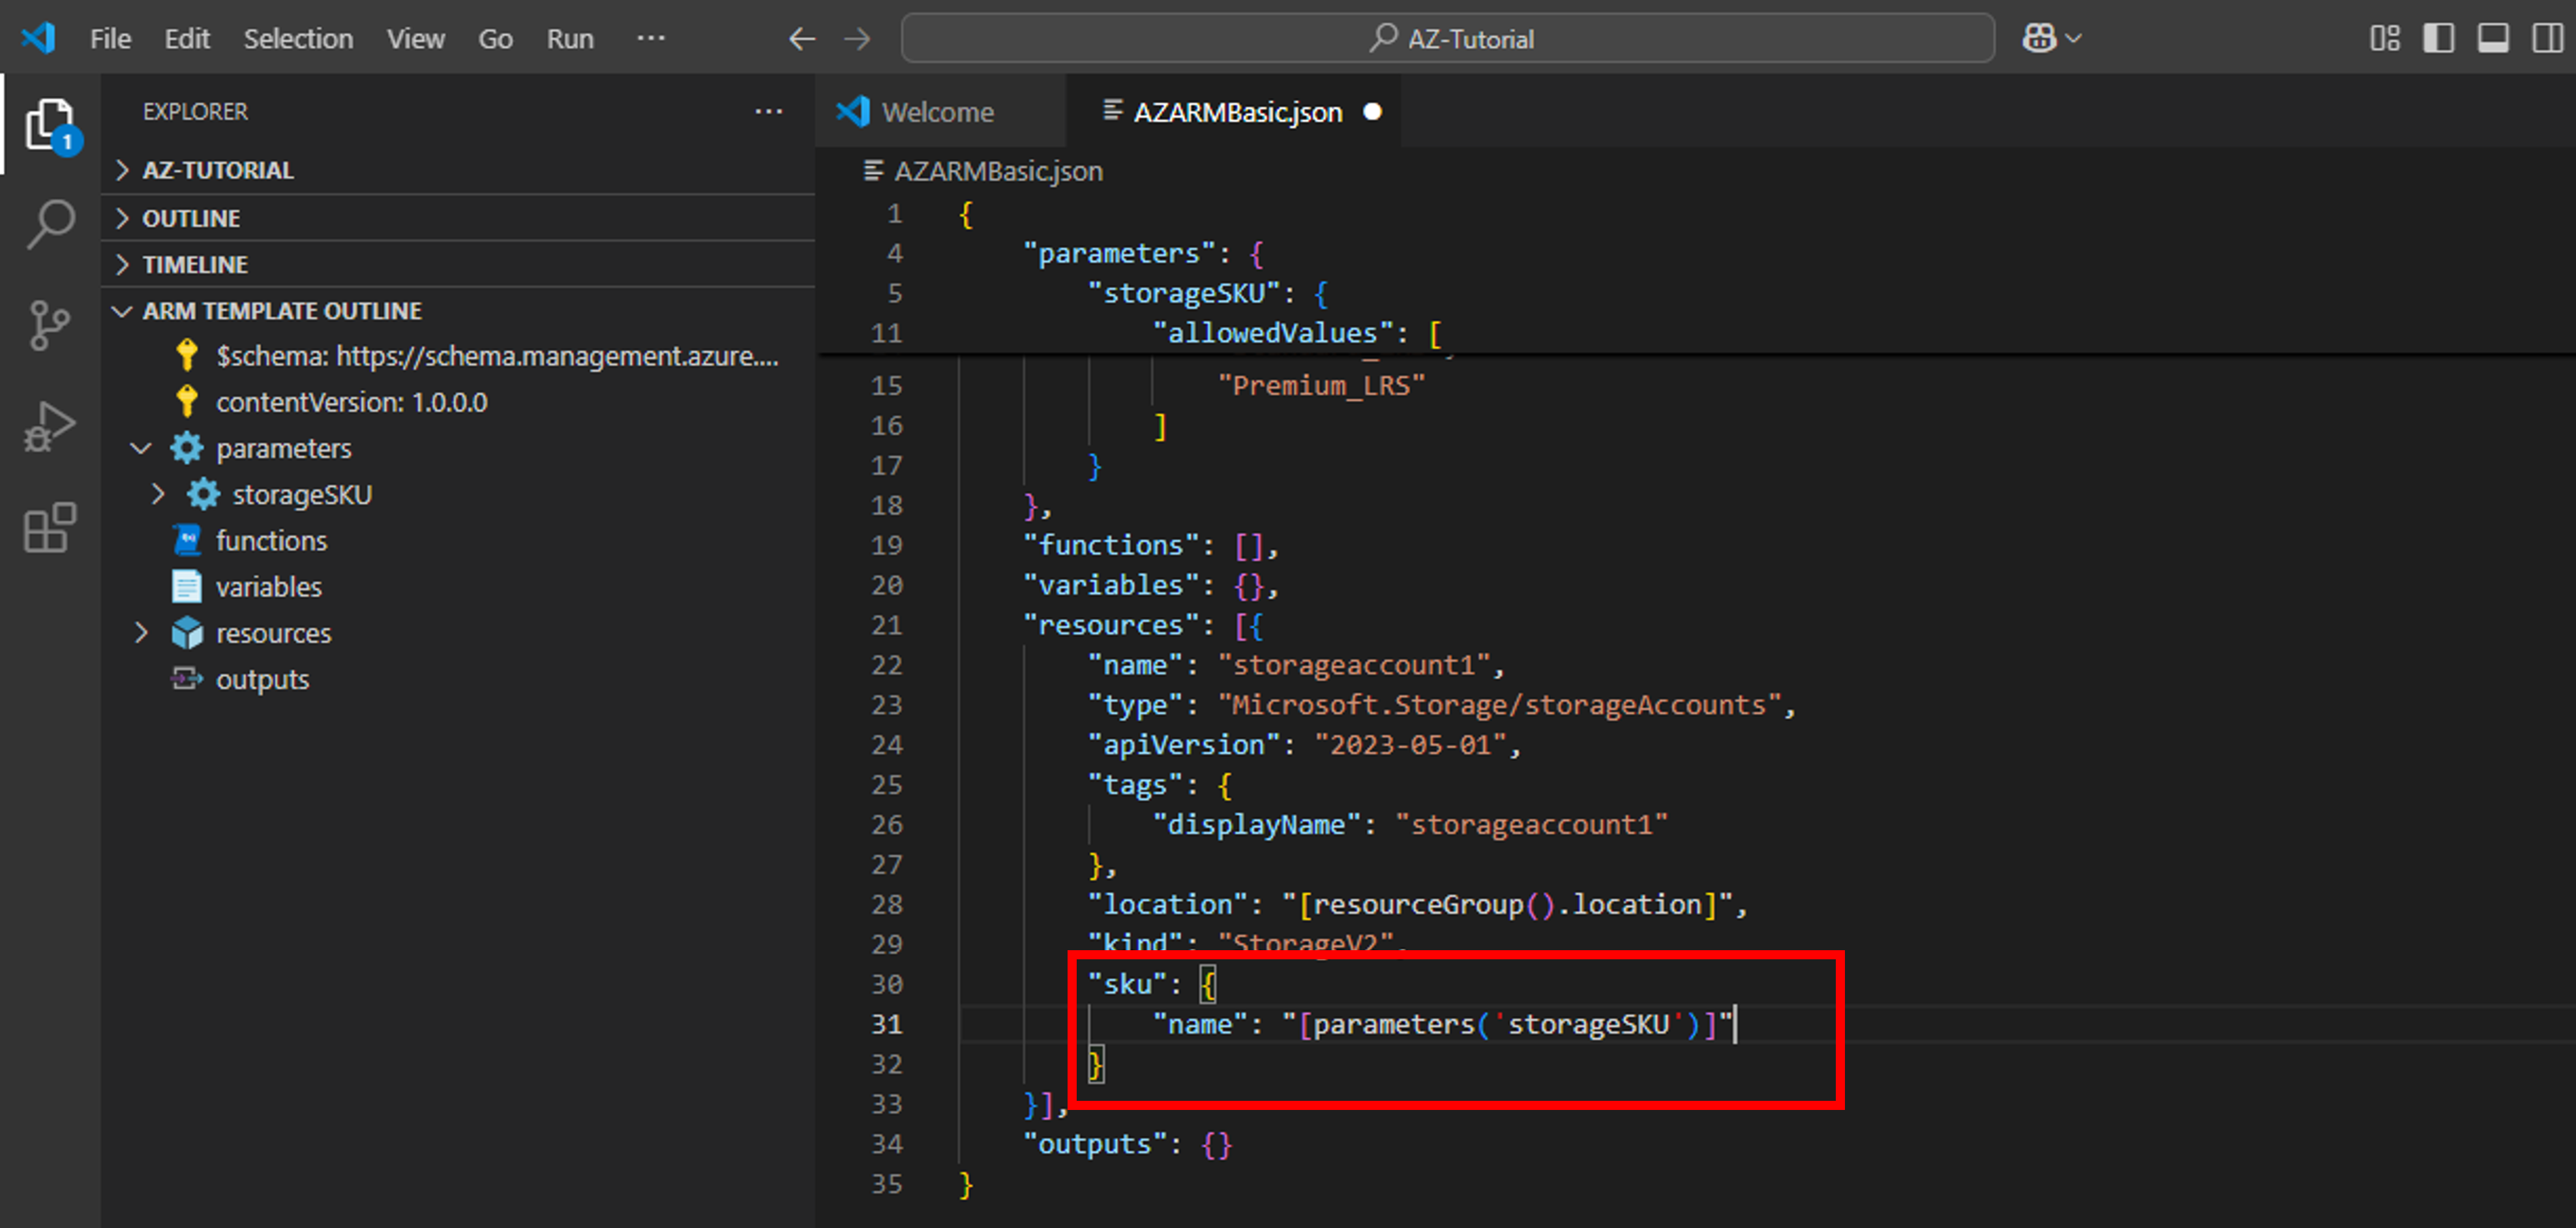
- Now, on the storage resource, we need to update the “sku” property to use the parameter. To do so, remove the current name. Enter a double quote and an opening square bracket [, which produces a list of ARM template functions. Select parameters from the list. Entering a single quote ‘ inside the round brackets produces a list of all parameters defined in the template, in this case, storageSKU. Select the parameter. I have removed sku.tier property because tier is optional and often inferred automatically from sku.name

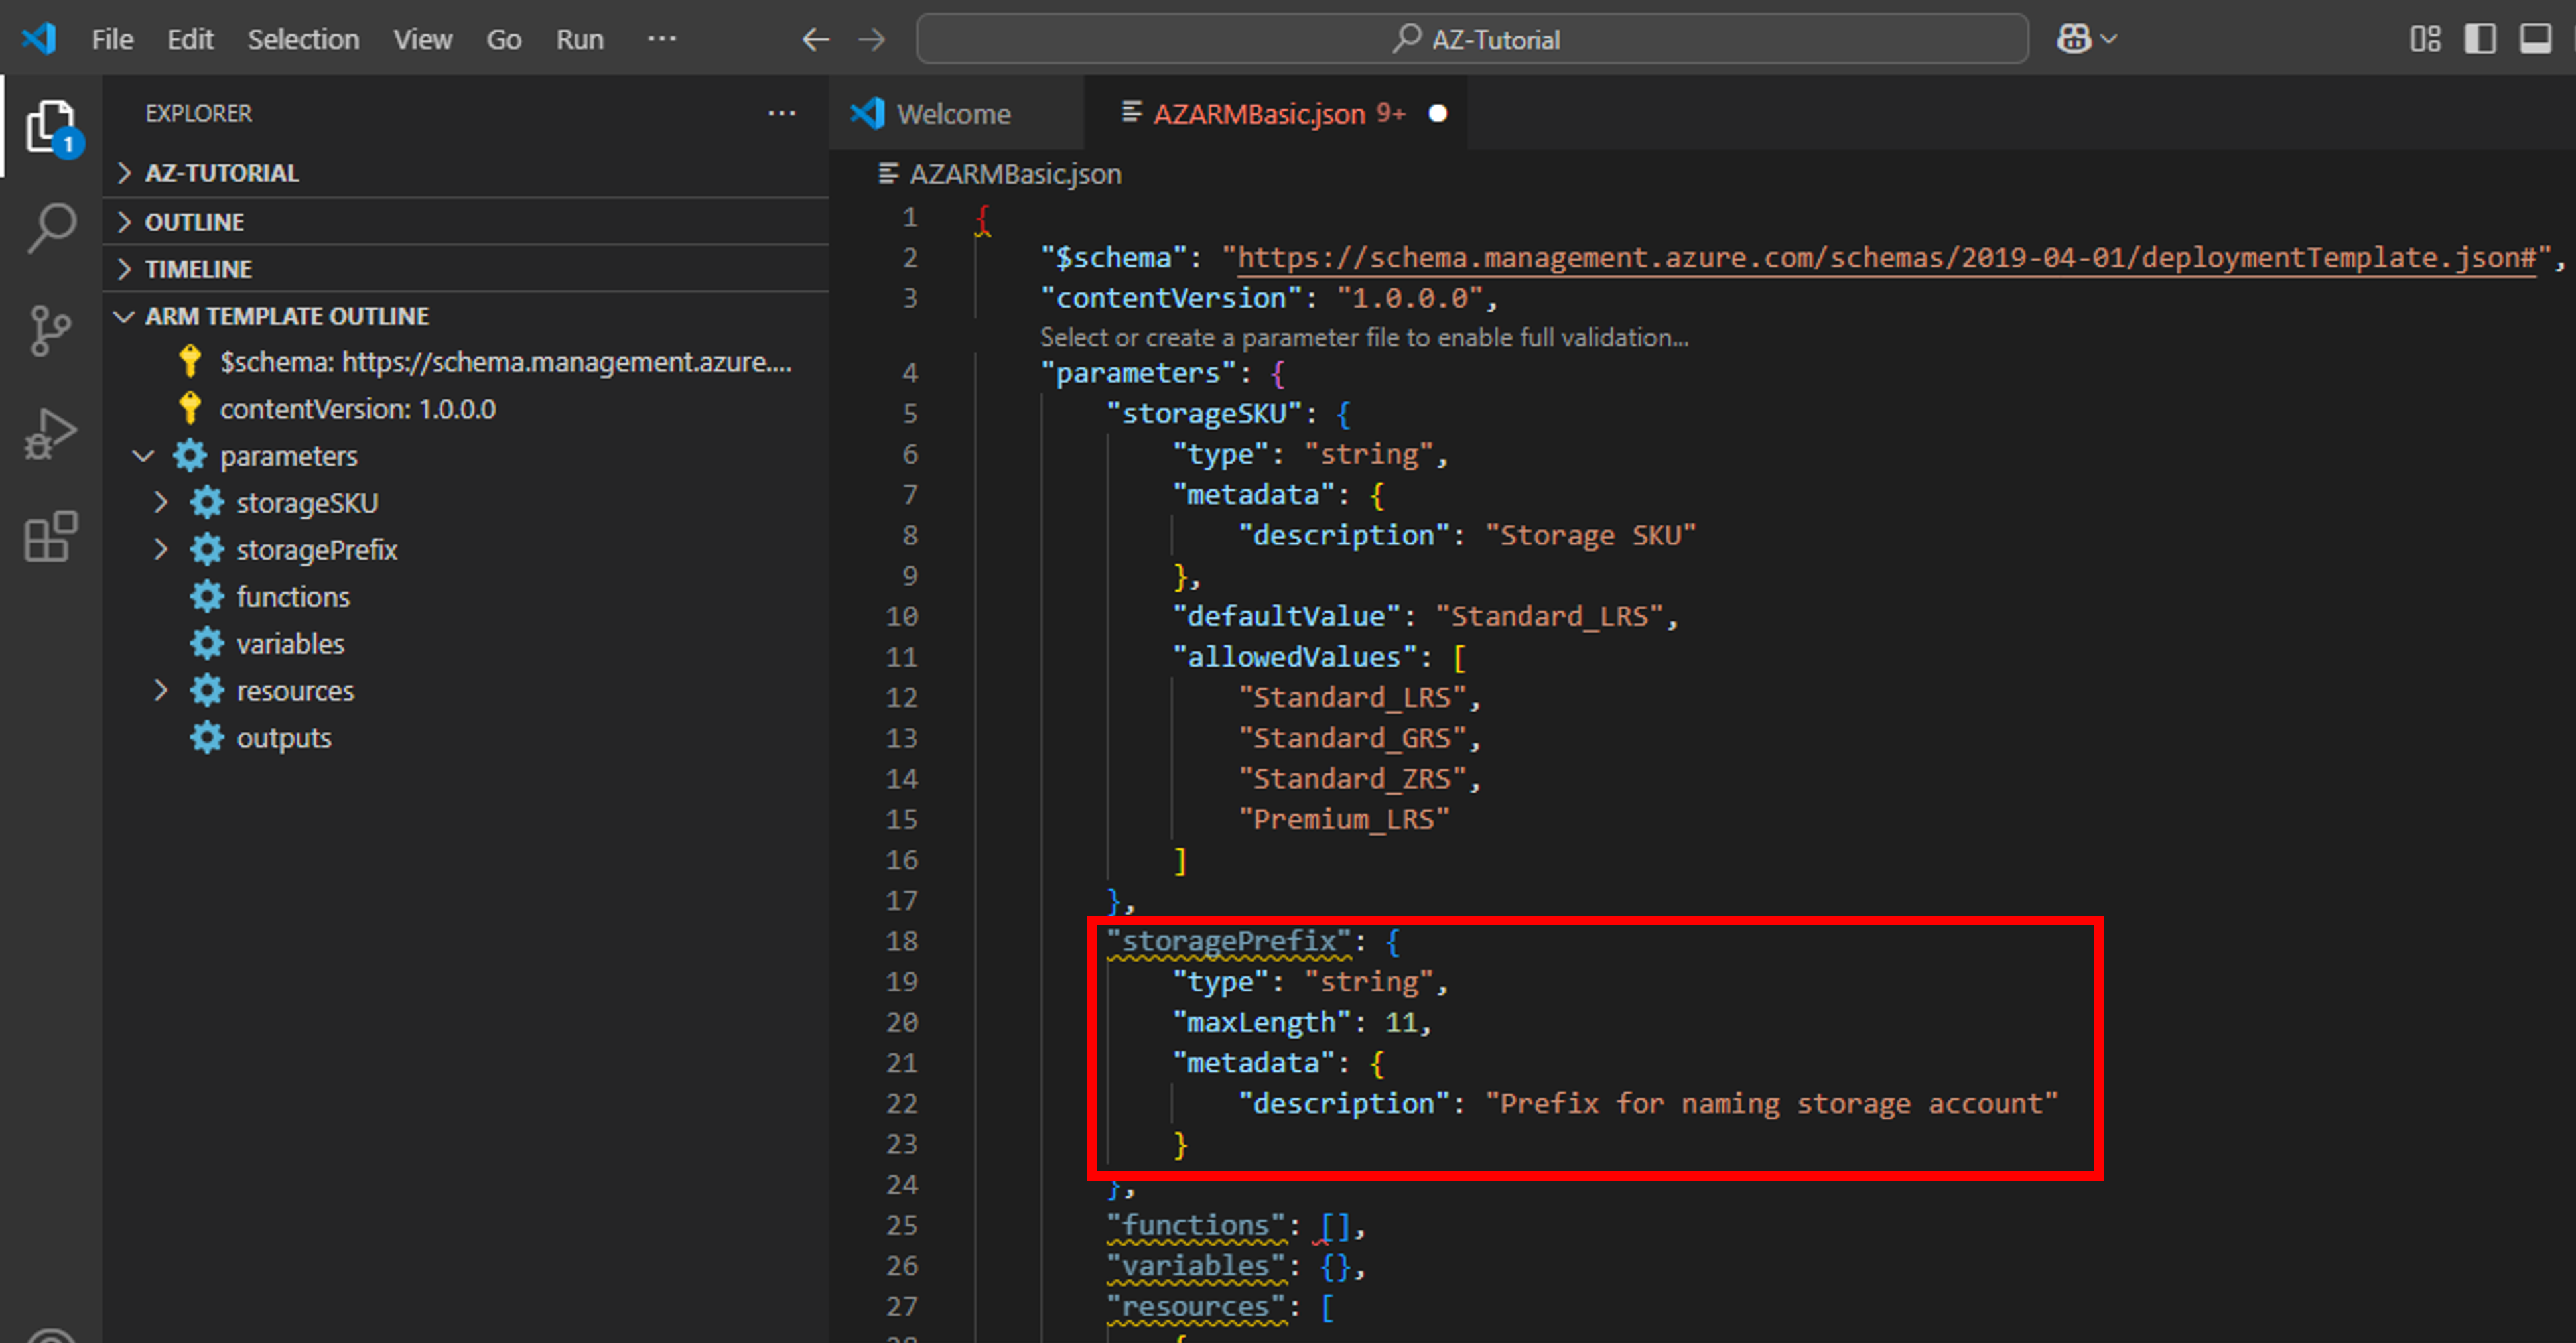
- Follow above steps to add another parameter “storagePrefix” for defining prefix for our storage account name. As storage account name must be unique across Azure Cloud, we generate a unique name by clubbing a prefix (parameter input by the user) with a 13 place alphanumeric value generated through uniquestring() function. We will keep max length of this parameter 11 to generate 24 digit globally unique storage account name.


Best Practices of Adding Parameters to ARM Template
- Use camel case for defining parameter names e.g. stogarePrefix
- Use parameters for values that vary according to the environment, like SKU, size, or capacity
- Always use parameters for user names and passwords / secrets
- Use securestring as “type” for all passwords and secrets. If you pass sensitive data in a JSON object, use the secureObject type. Template parameters with secure string or secure object types can’t be read after resource deployment
Adding Variables to ARM Template
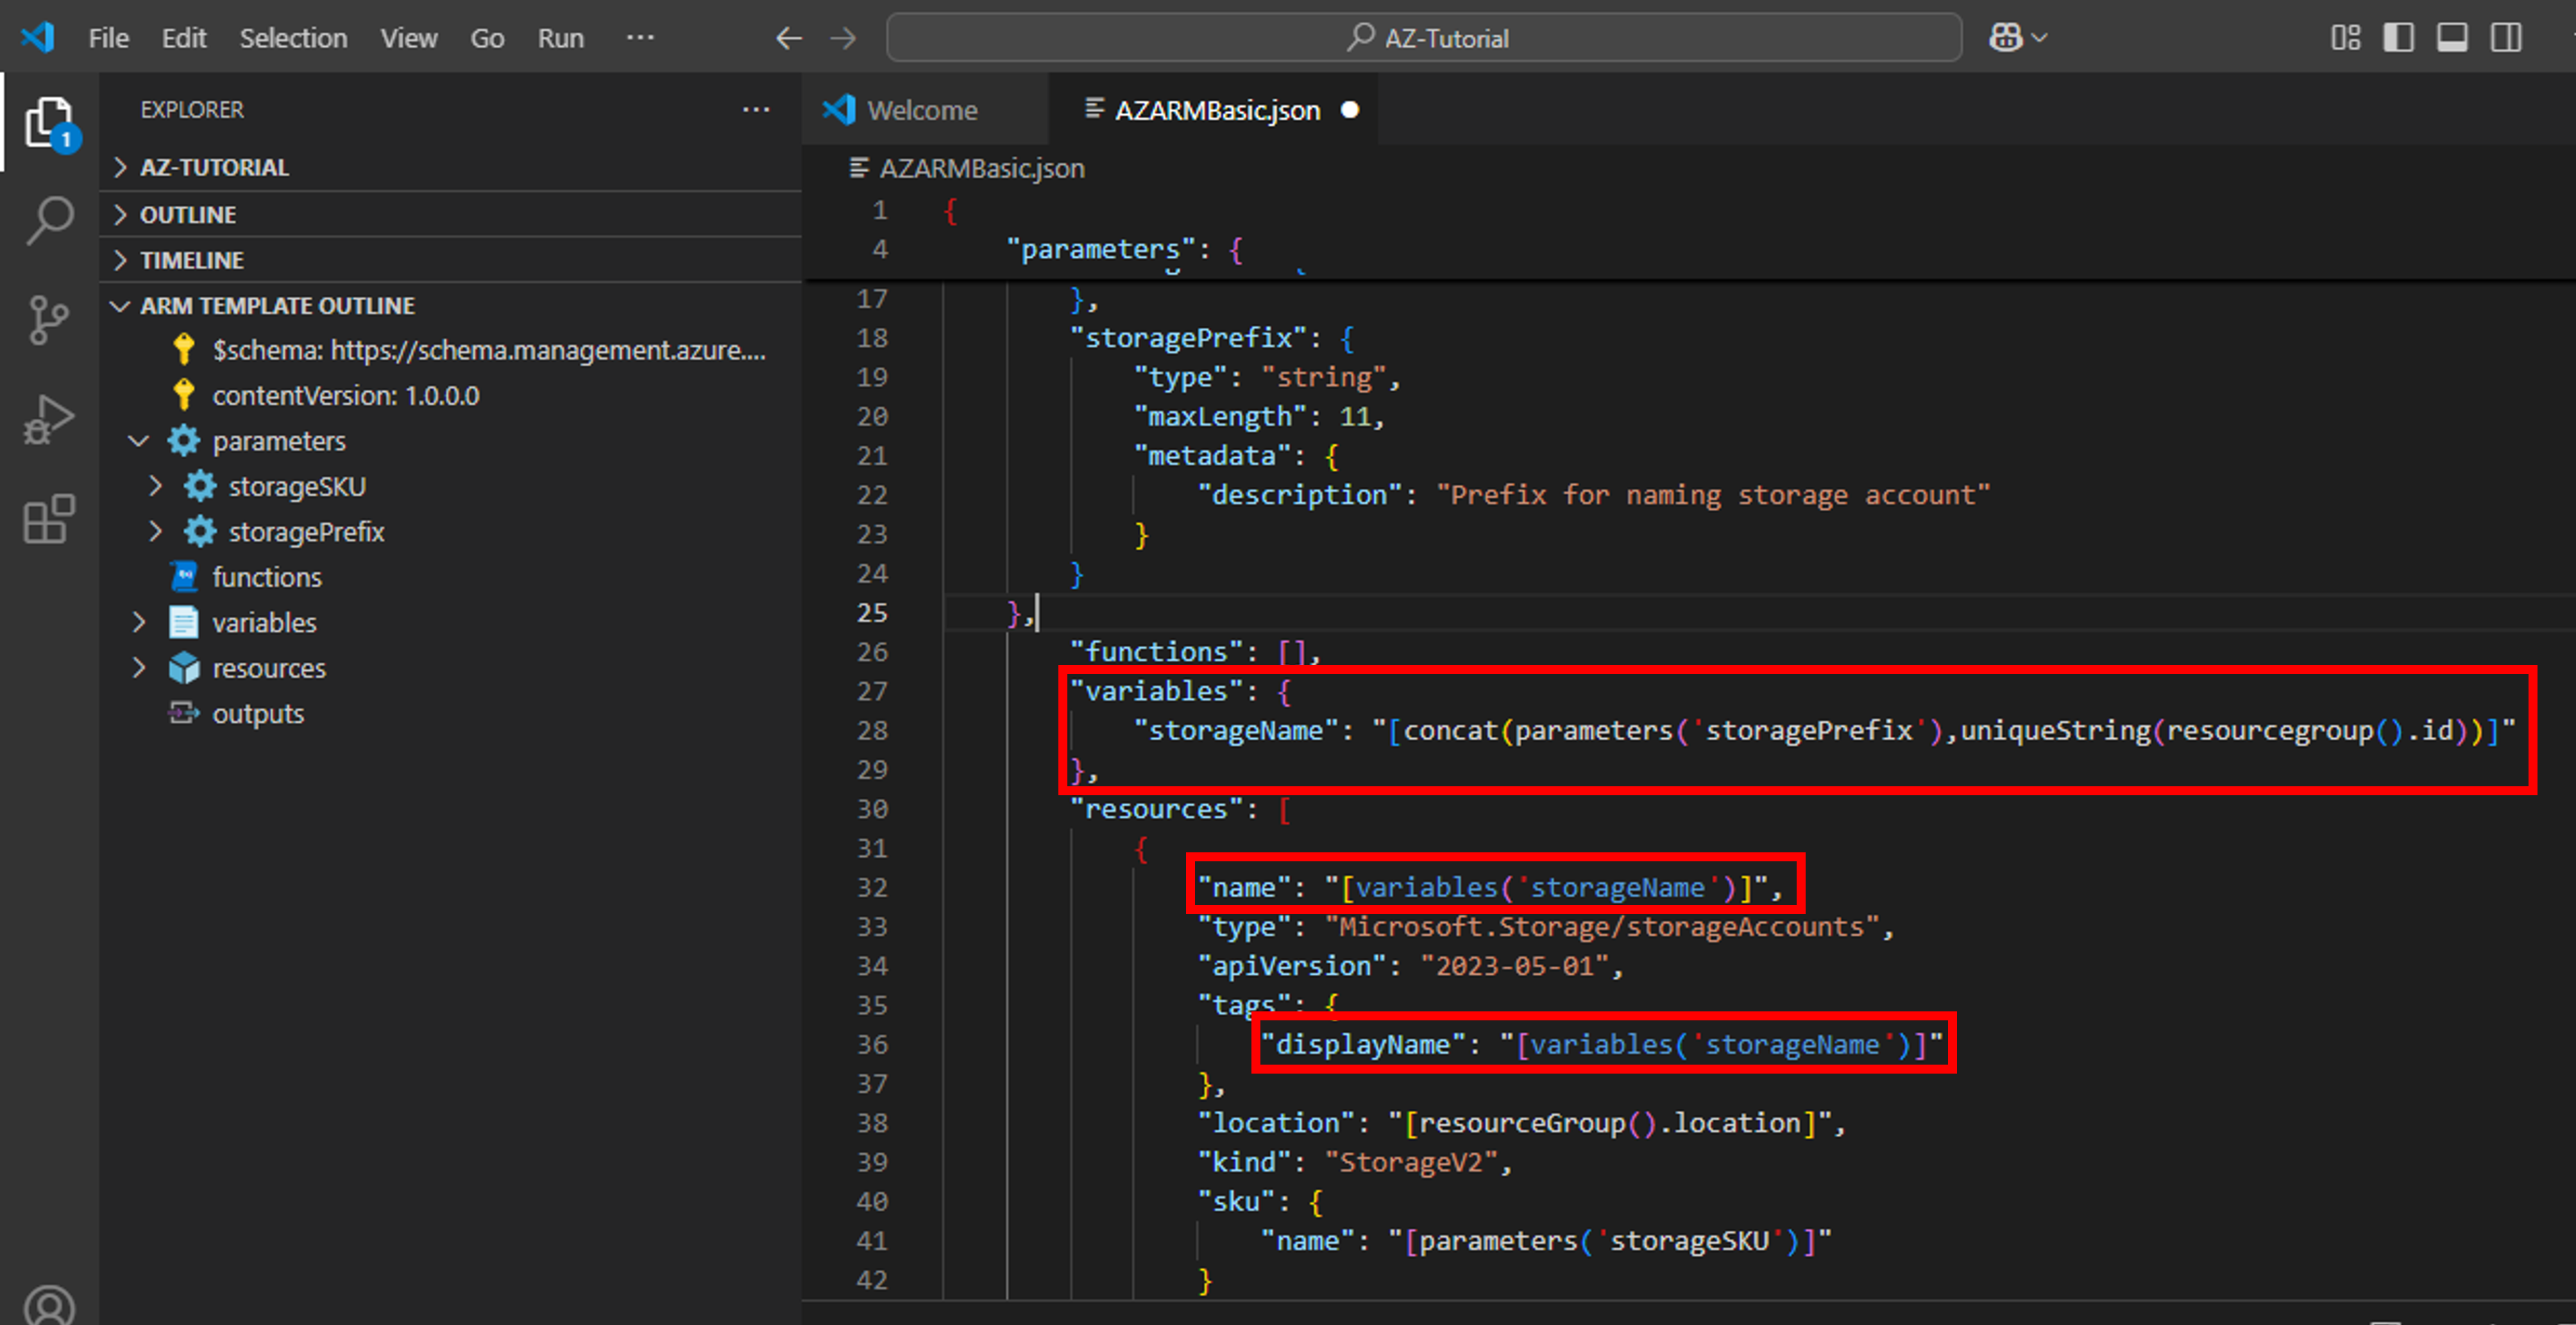
- Place your cursor in the variables block, press Enter, type ” and then select the new-variable snippet. Type “storageName” as the name of variable and enter expression in the snap below as its value.
 The expression is using concat() function to combine ‘storagePrefix’ with a value generated using unique() function. Unique() function creates a deterministic hash string of length 13. The string isn’t globally unique but can be made one by combining it with a prefix from your naming convention. The function is helpful when you want to create a unique name for a resource. In our case, resourceGroup().id is input as a parameter to unique() function.
 - Now, on the storage resource, update the “name” property to use the variable. To do so, remove the current name. Enter variables, then (, then ‘ and then select the variable storageName. Use the same process to update “displayName” property as well. Refer to above snap.
 The expression is using concat() function to combine ‘storagePrefix’ with a value generated using unique() function. Unique() function creates a deterministic hash string of length 13. The string isn’t globally unique but can be made one by combining it with a prefix from your naming convention. The function is helpful when you want to create a unique name for a resource. In our case, resourceGroup().id is input as a parameter to unique() function.
Best Practices of Adding Variables to ARM Template
- Use camel case for variable names
- Use variables for values that you need to use more than once in a template. If a value is used only once, a hard-coded value makes template easier to read.
- Use variables for values that you construct from a complex arrangement of functions. Your template is easier to read when the complex expression only appears in variables.
- Include variables for resource names that must be unique.
Adding Output to ARM Template
We can use Outputs to return values from the deployed template. In this section, we shall return primaryendpoints of the deployed storage account.
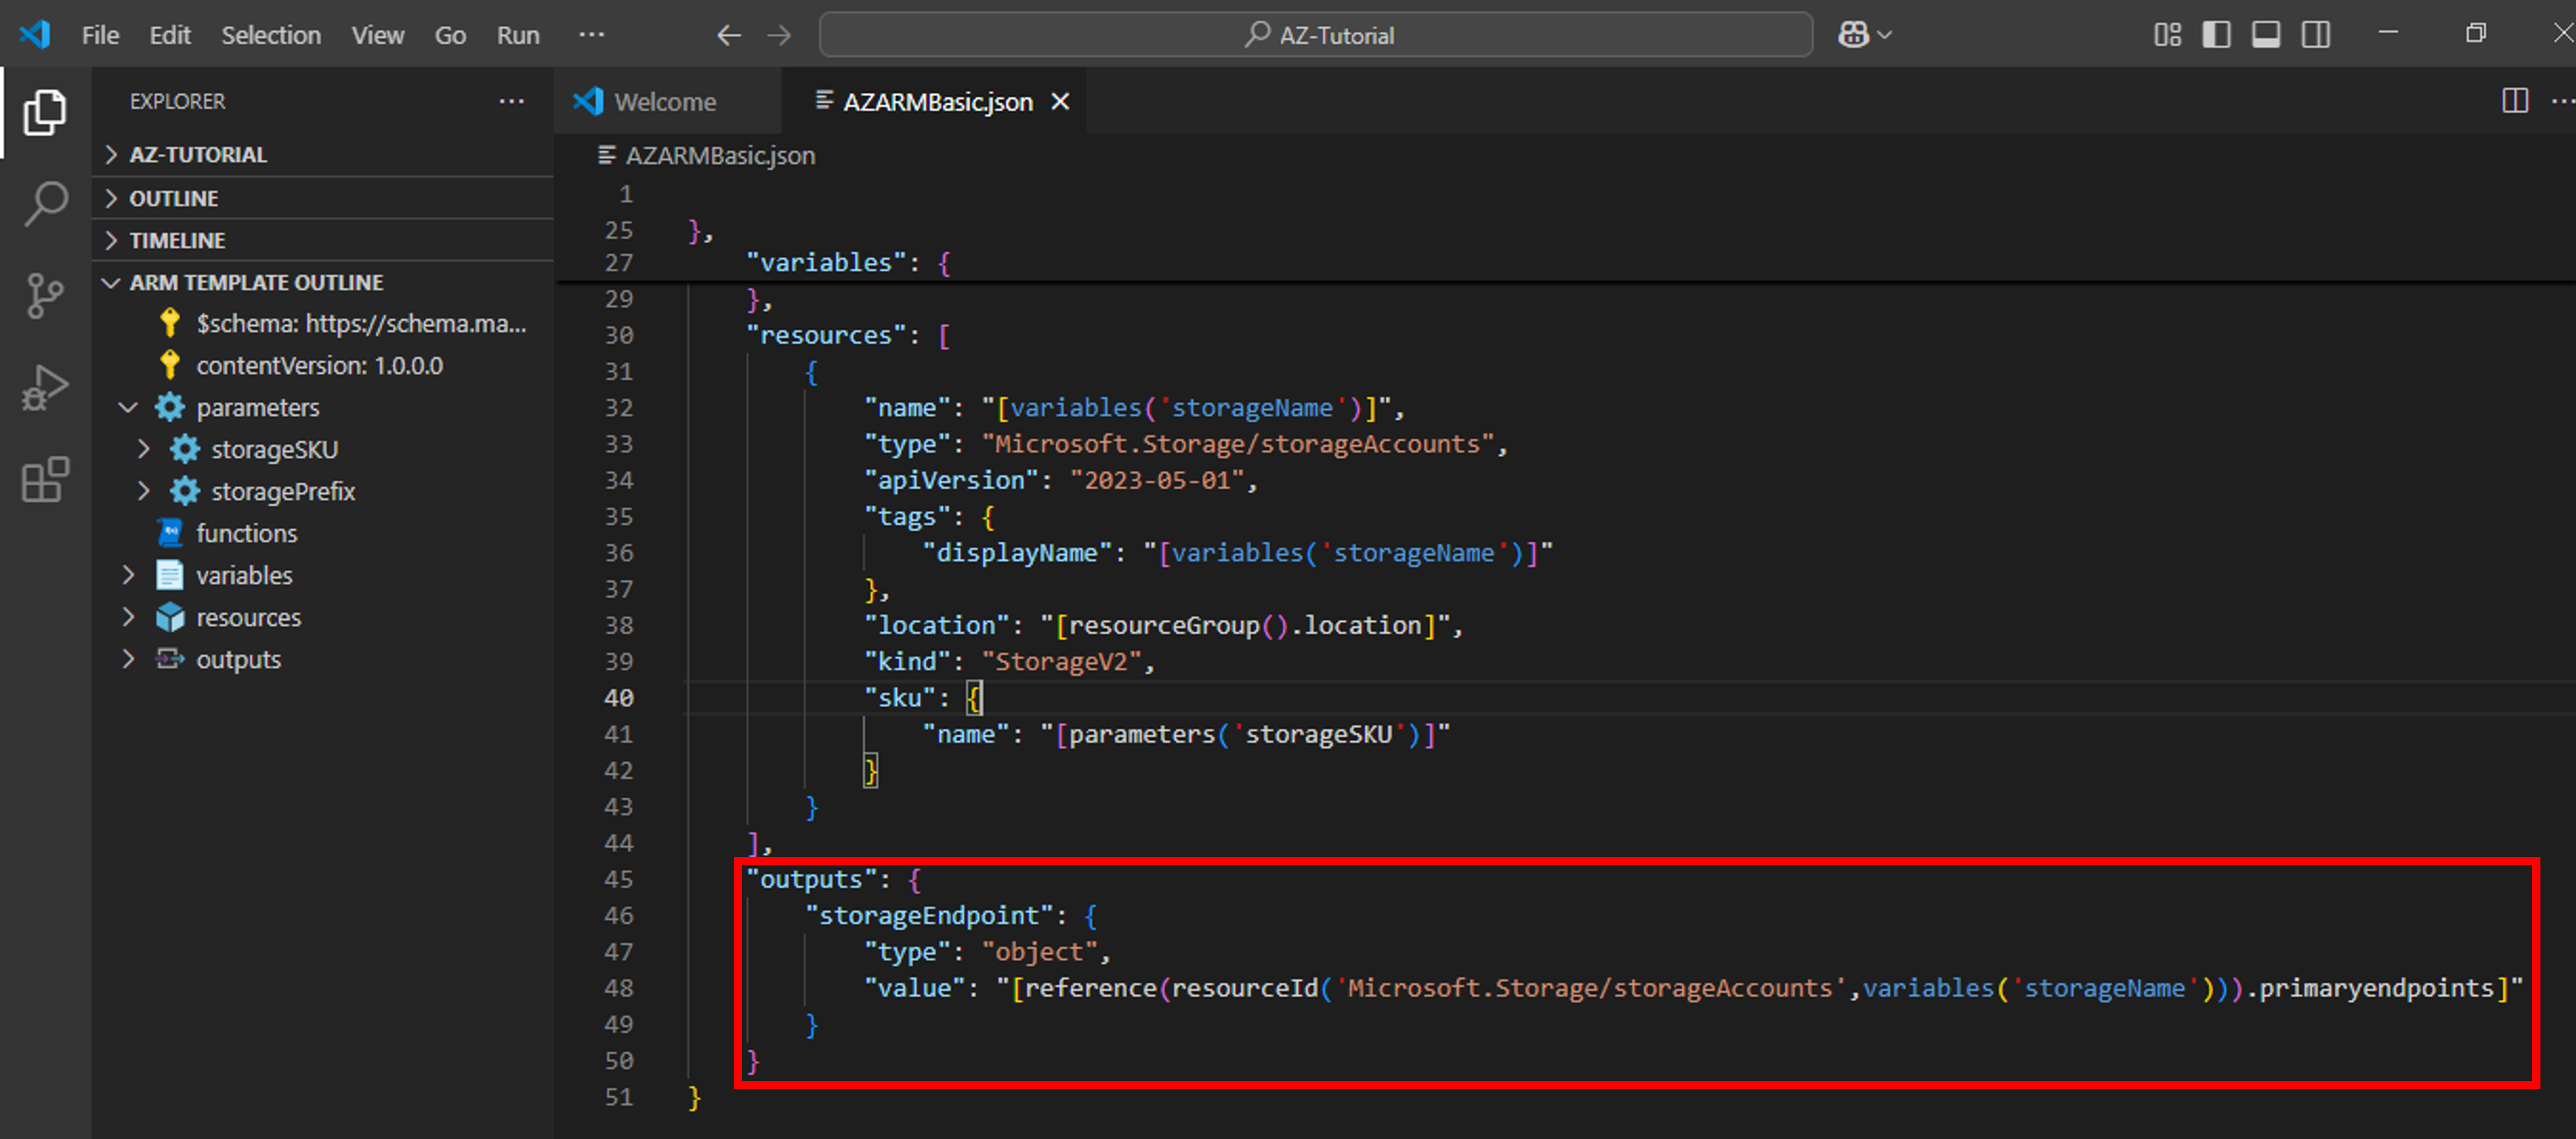
- Place your cursor inside the braces in the “outputs” section, press Enter and then type out. Select new-output. A generic output named ‘output1’ is added to the template.
- Change ‘output1’ to “storageEndpoint” and the value of type to ‘object’. Change the value of “value” as mentioned in the snap. Because we specified object as the “type”, it returns the object in JSON format.

Note that reference() function has been used to return primaryendpoints of storage account. reference() function is used to dynamically retrieve the endpoints. resourceid (resourcetype, resourcename) function is used to get the resource id of the storage account in following format:
/subscriptions/<subscriptionId>/resourceGroups/<resourceGroupName>/providers/Microsoft.Storage/storageAccounts/<storageAccountName>
Resourceid is then input as a parameter to reference() function for returning primaryendpoint URLs.
How to Deploy an ARM Template
When we deploy a template, Resource Manager converts the template into REST API operations. We can deploy an ARM template to Azure in one of the following ways:
- Deploy a local template
- Deploy a linked template
- Deploy in a CI/CD pipeline
Local template is the template stored on our local computer. Linked template is used for modular template architecture having a main and one or more linked templates (modules). CI/CD pipeline deployment is used to ensure rapid updates to infrastructure.
In this tutorial, we shall be deploying local template using Azure Powershell.
To deploy above template to Azure, you need to sign in to your Azure account from VS Code terminal. Make sure that you have an active account with Azure to deploy your solution.
Make sure that Terminal window is visible at the bottom of the VS Code editor. In case it is not visible, select Terminal from View menu. Alternately, you can click Ctrl + ` to open Terminal window as well.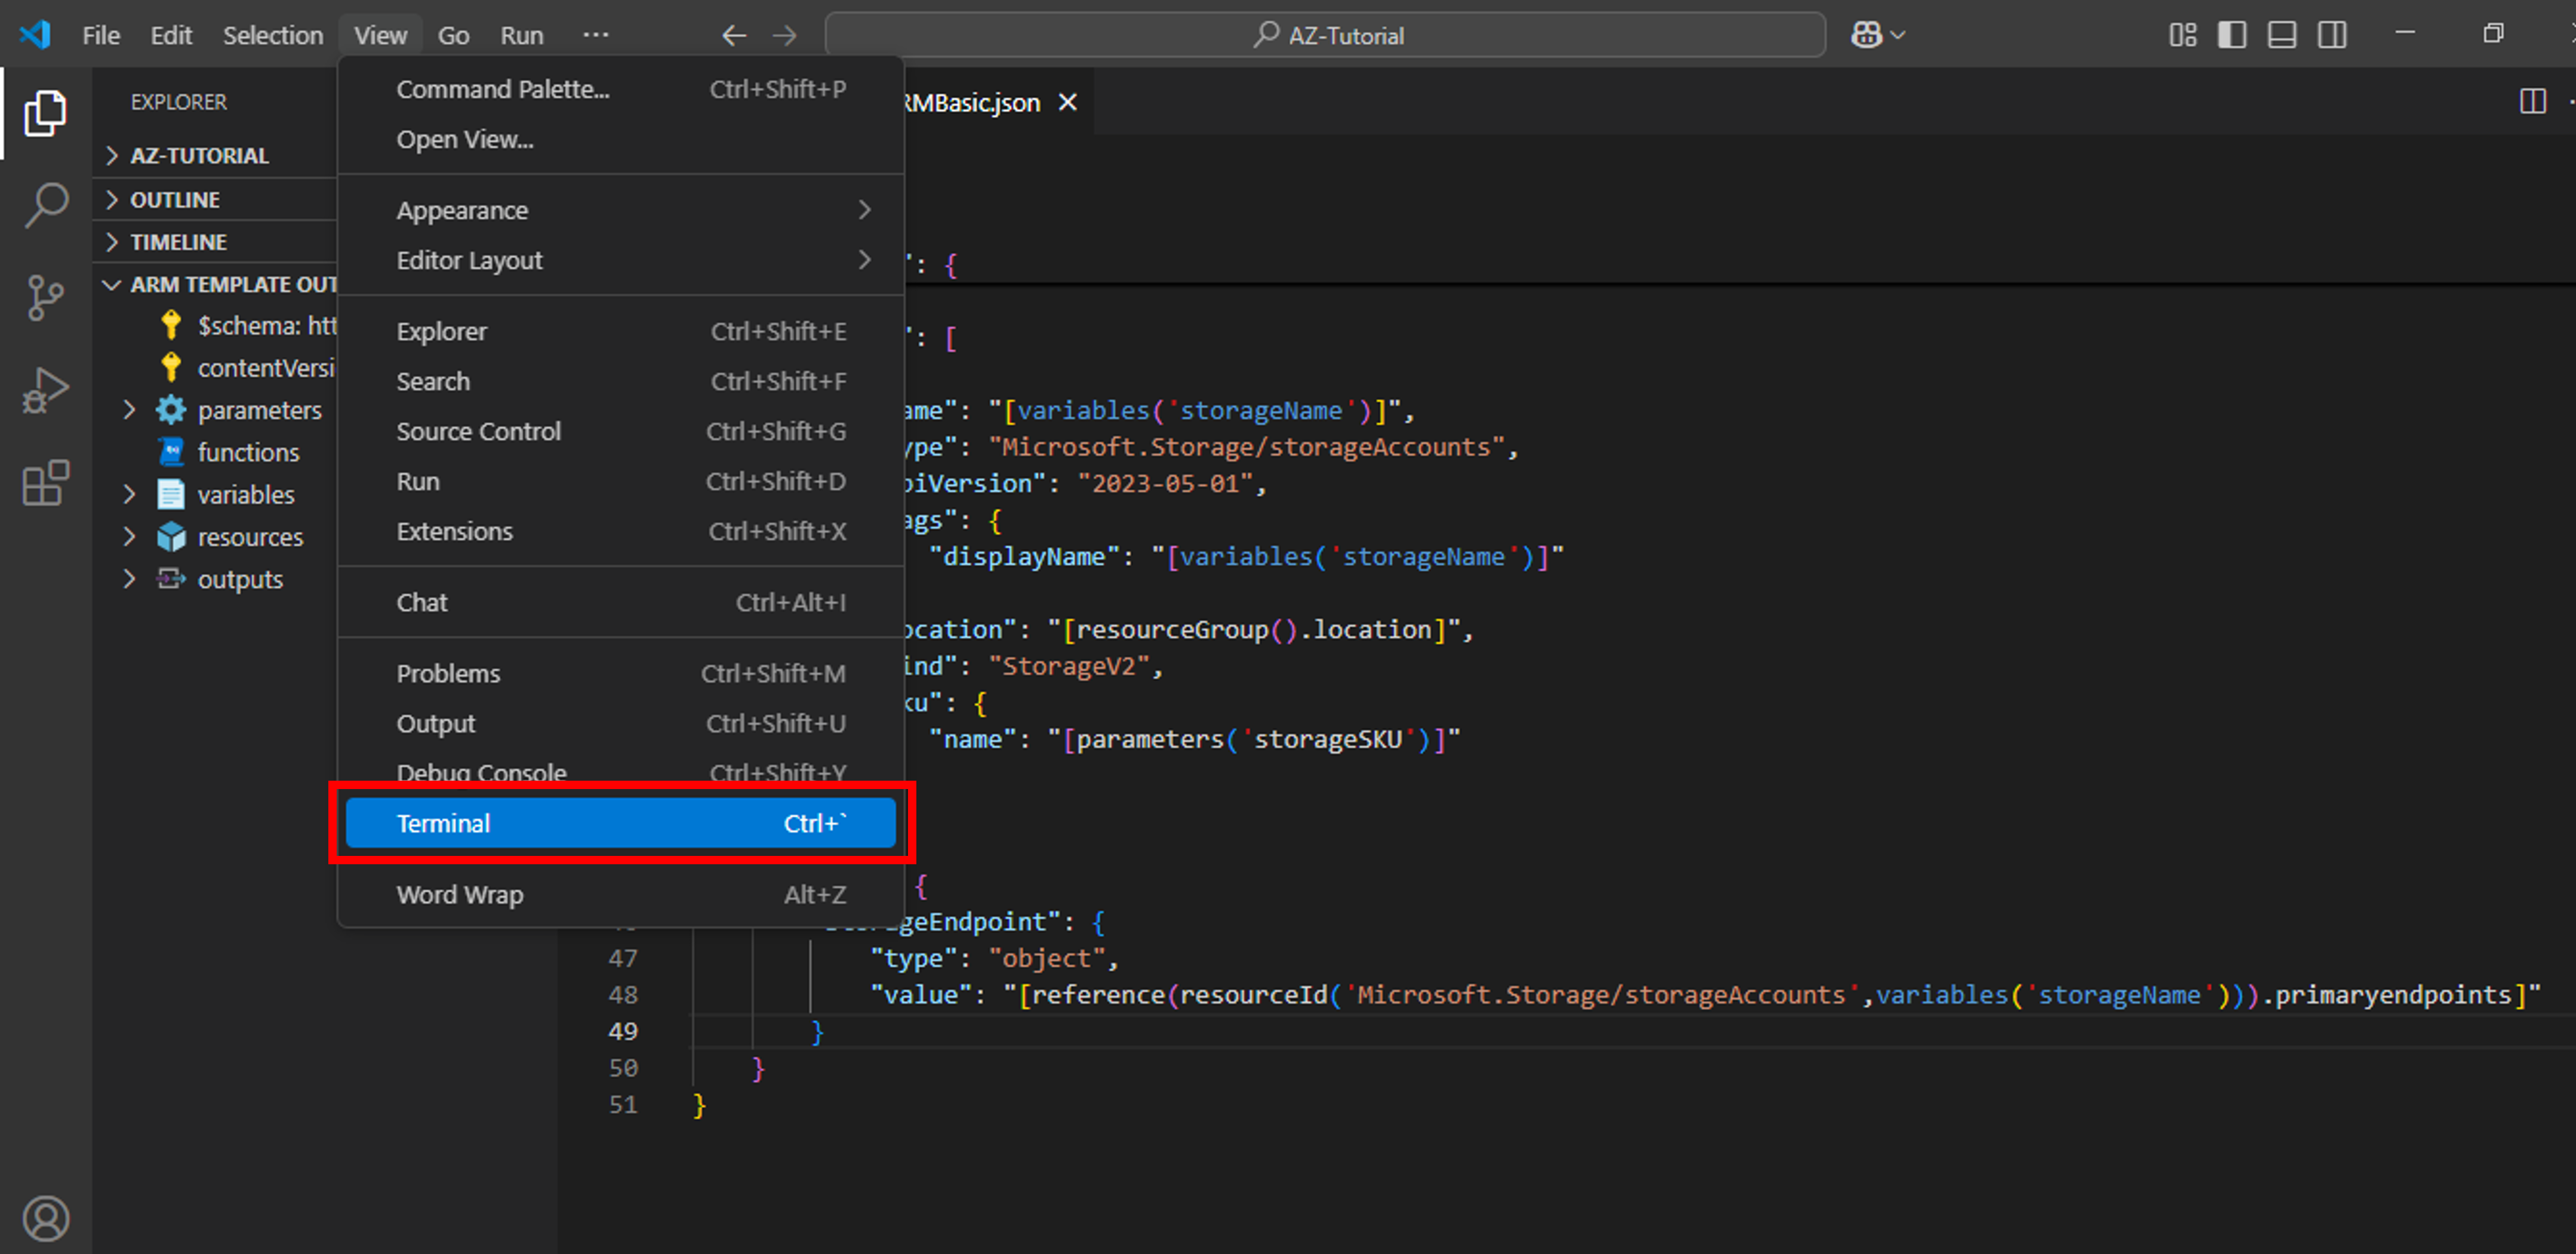
You can create a new Terminal within Terminal window by clicking down arrow and then Powershell from Terminal window menu.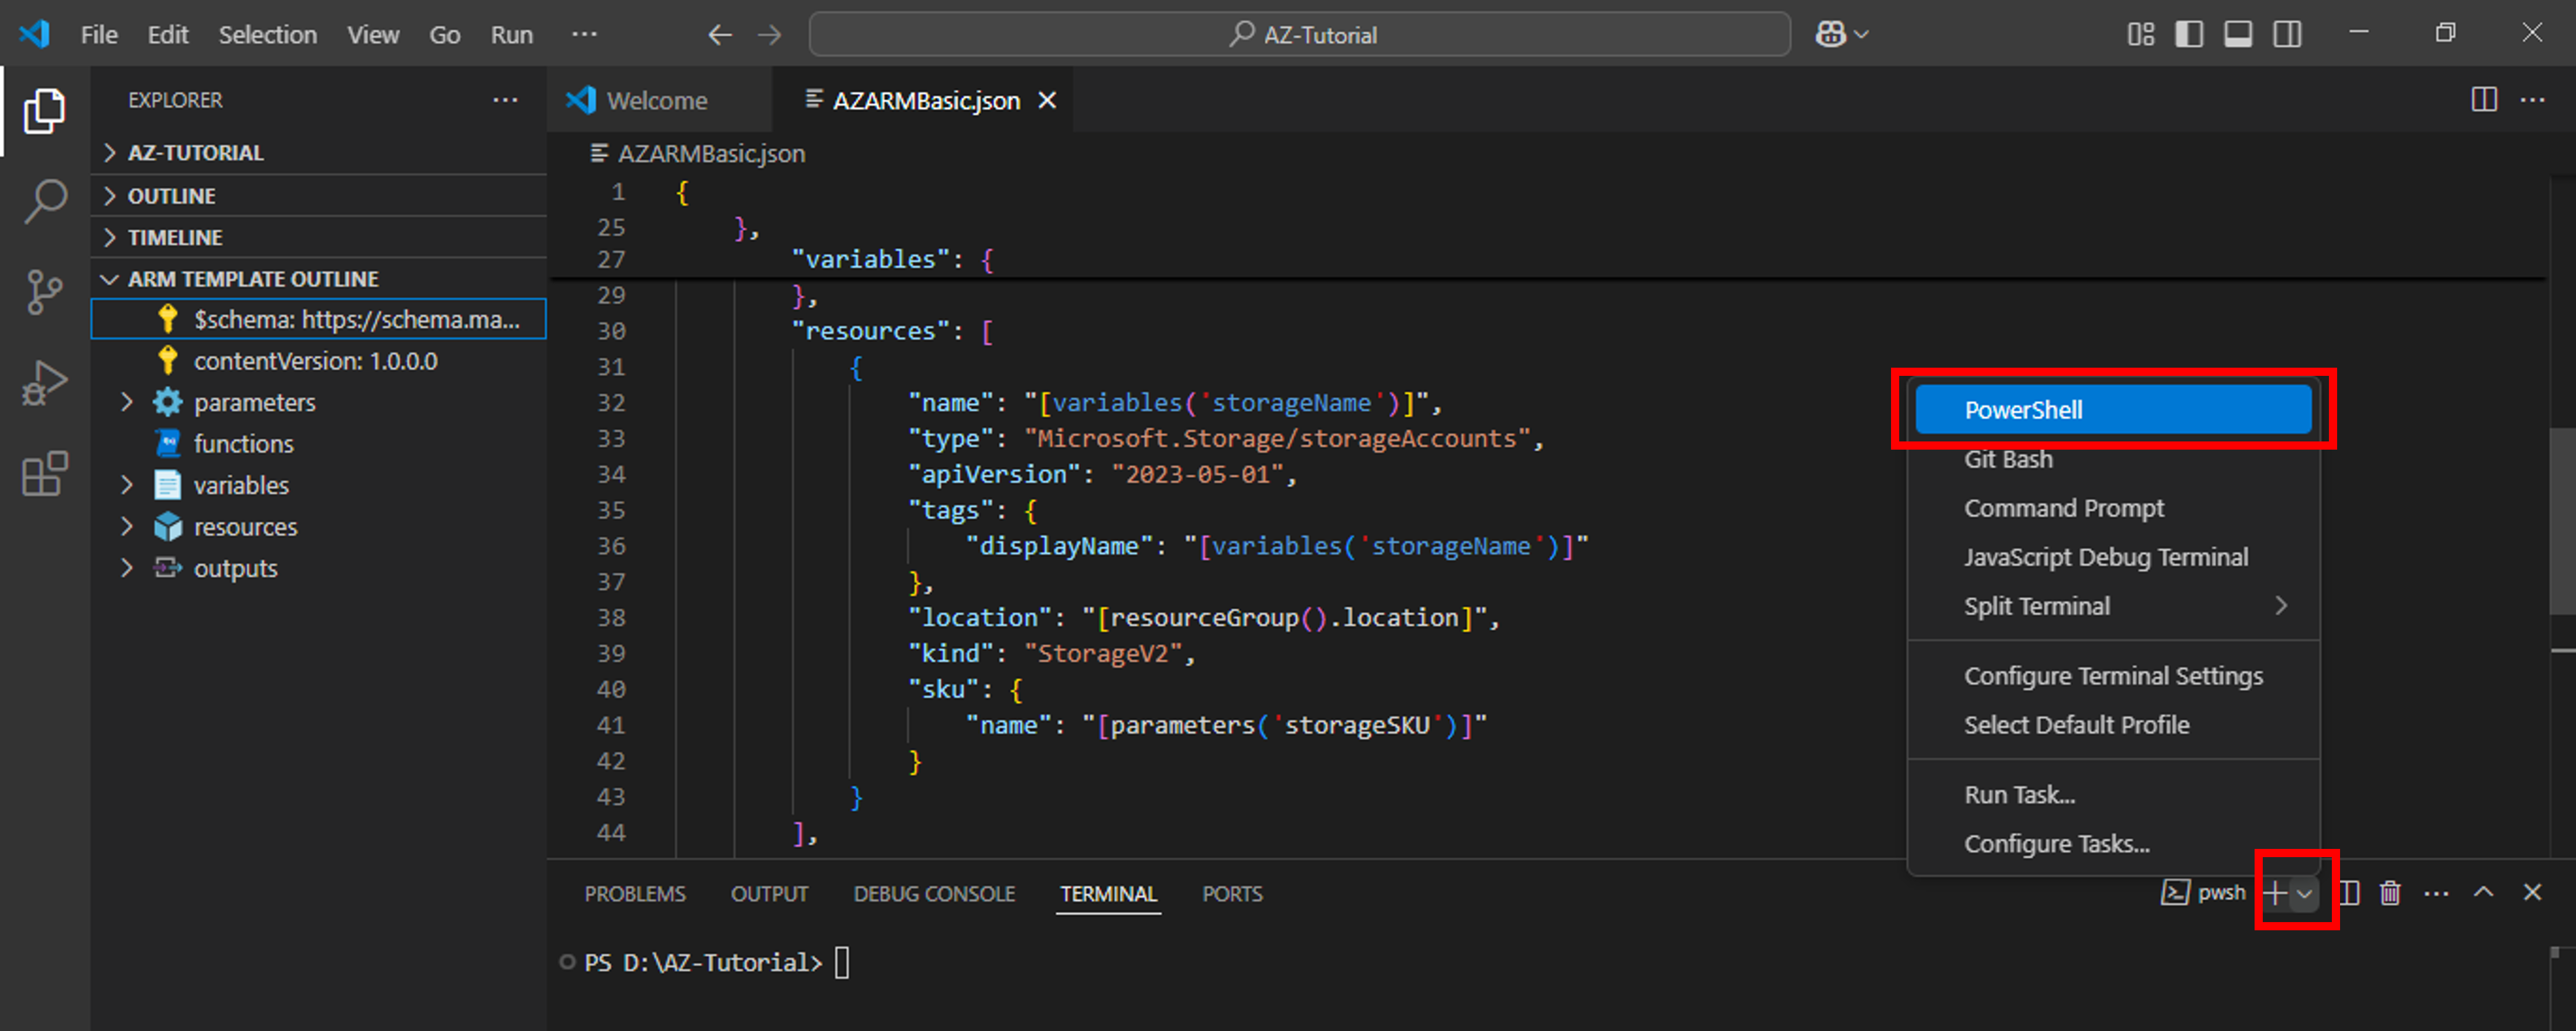
Connect to Az Account
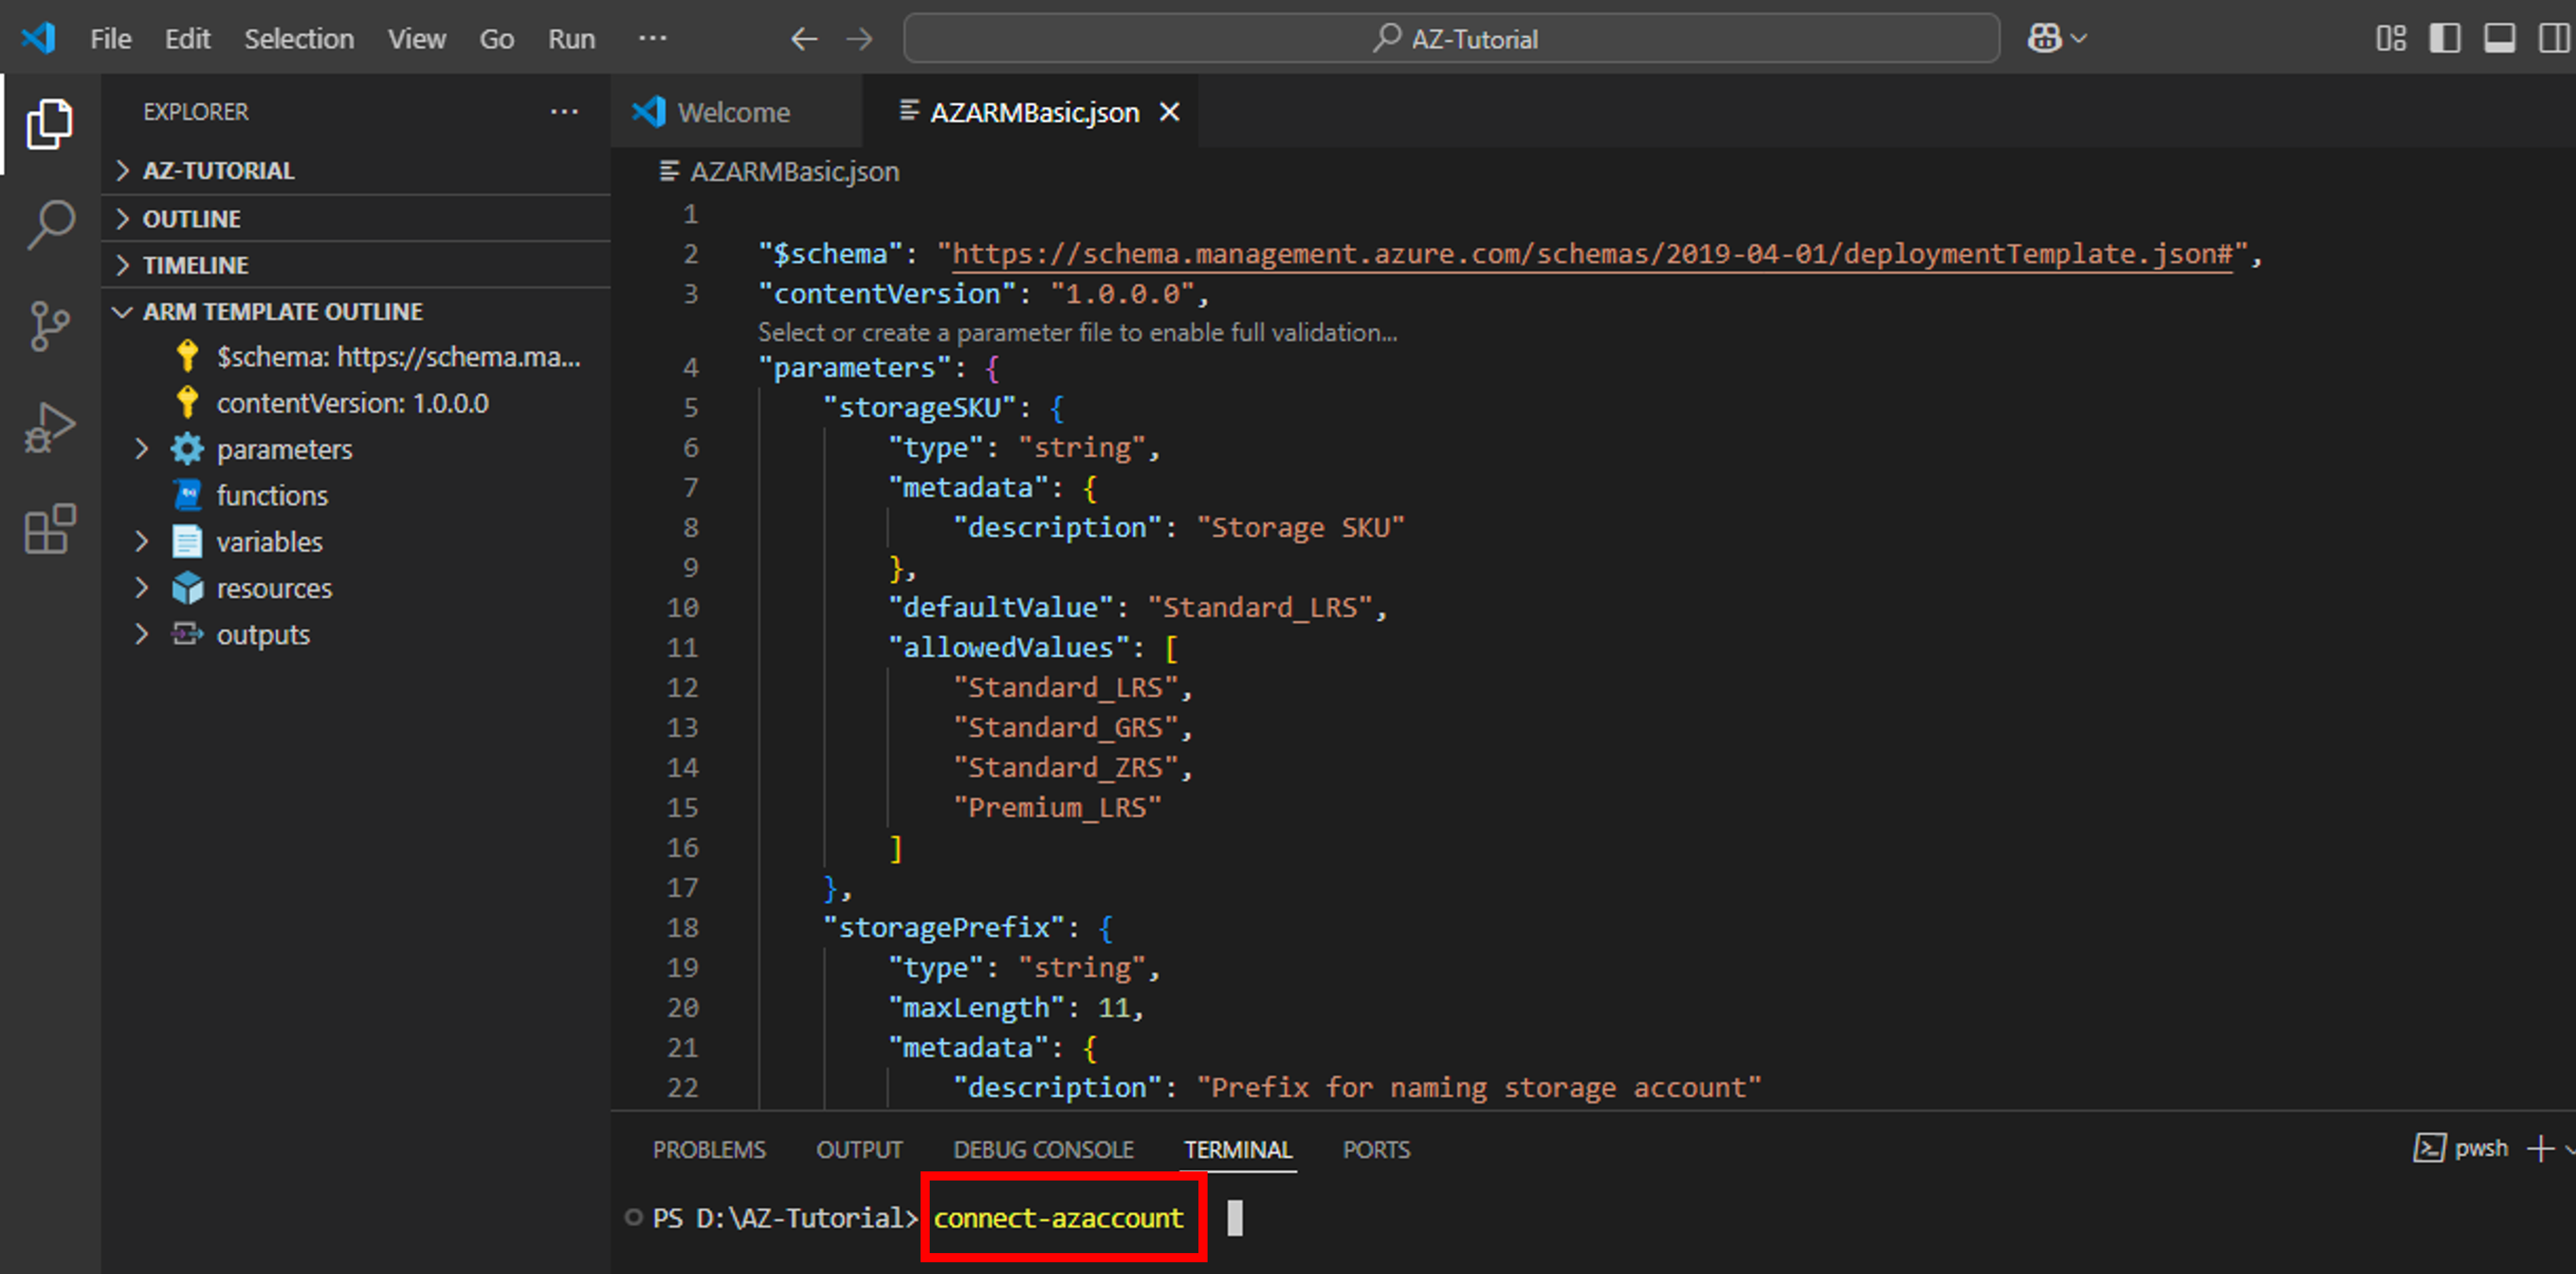
- First, sign in to Azure by typing ‘connect-AzAccount’ command in Azure Powershell terminal

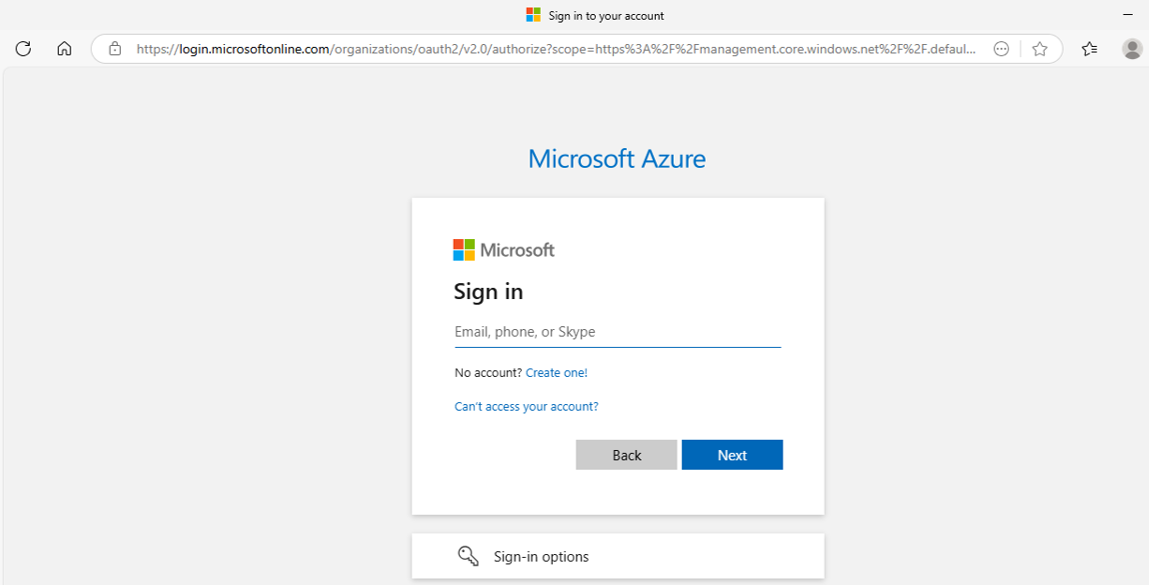
- A browser window for your default browser will pop up. Enter your credentials for Azure account to sign in

- You will be prompted once you are successfully authenticated. In case you face difficulty in logging in, simple workaround is to first log in to Azure Portal through a browser and then try connecting with VS Code by pasting the log in link in the same browser.

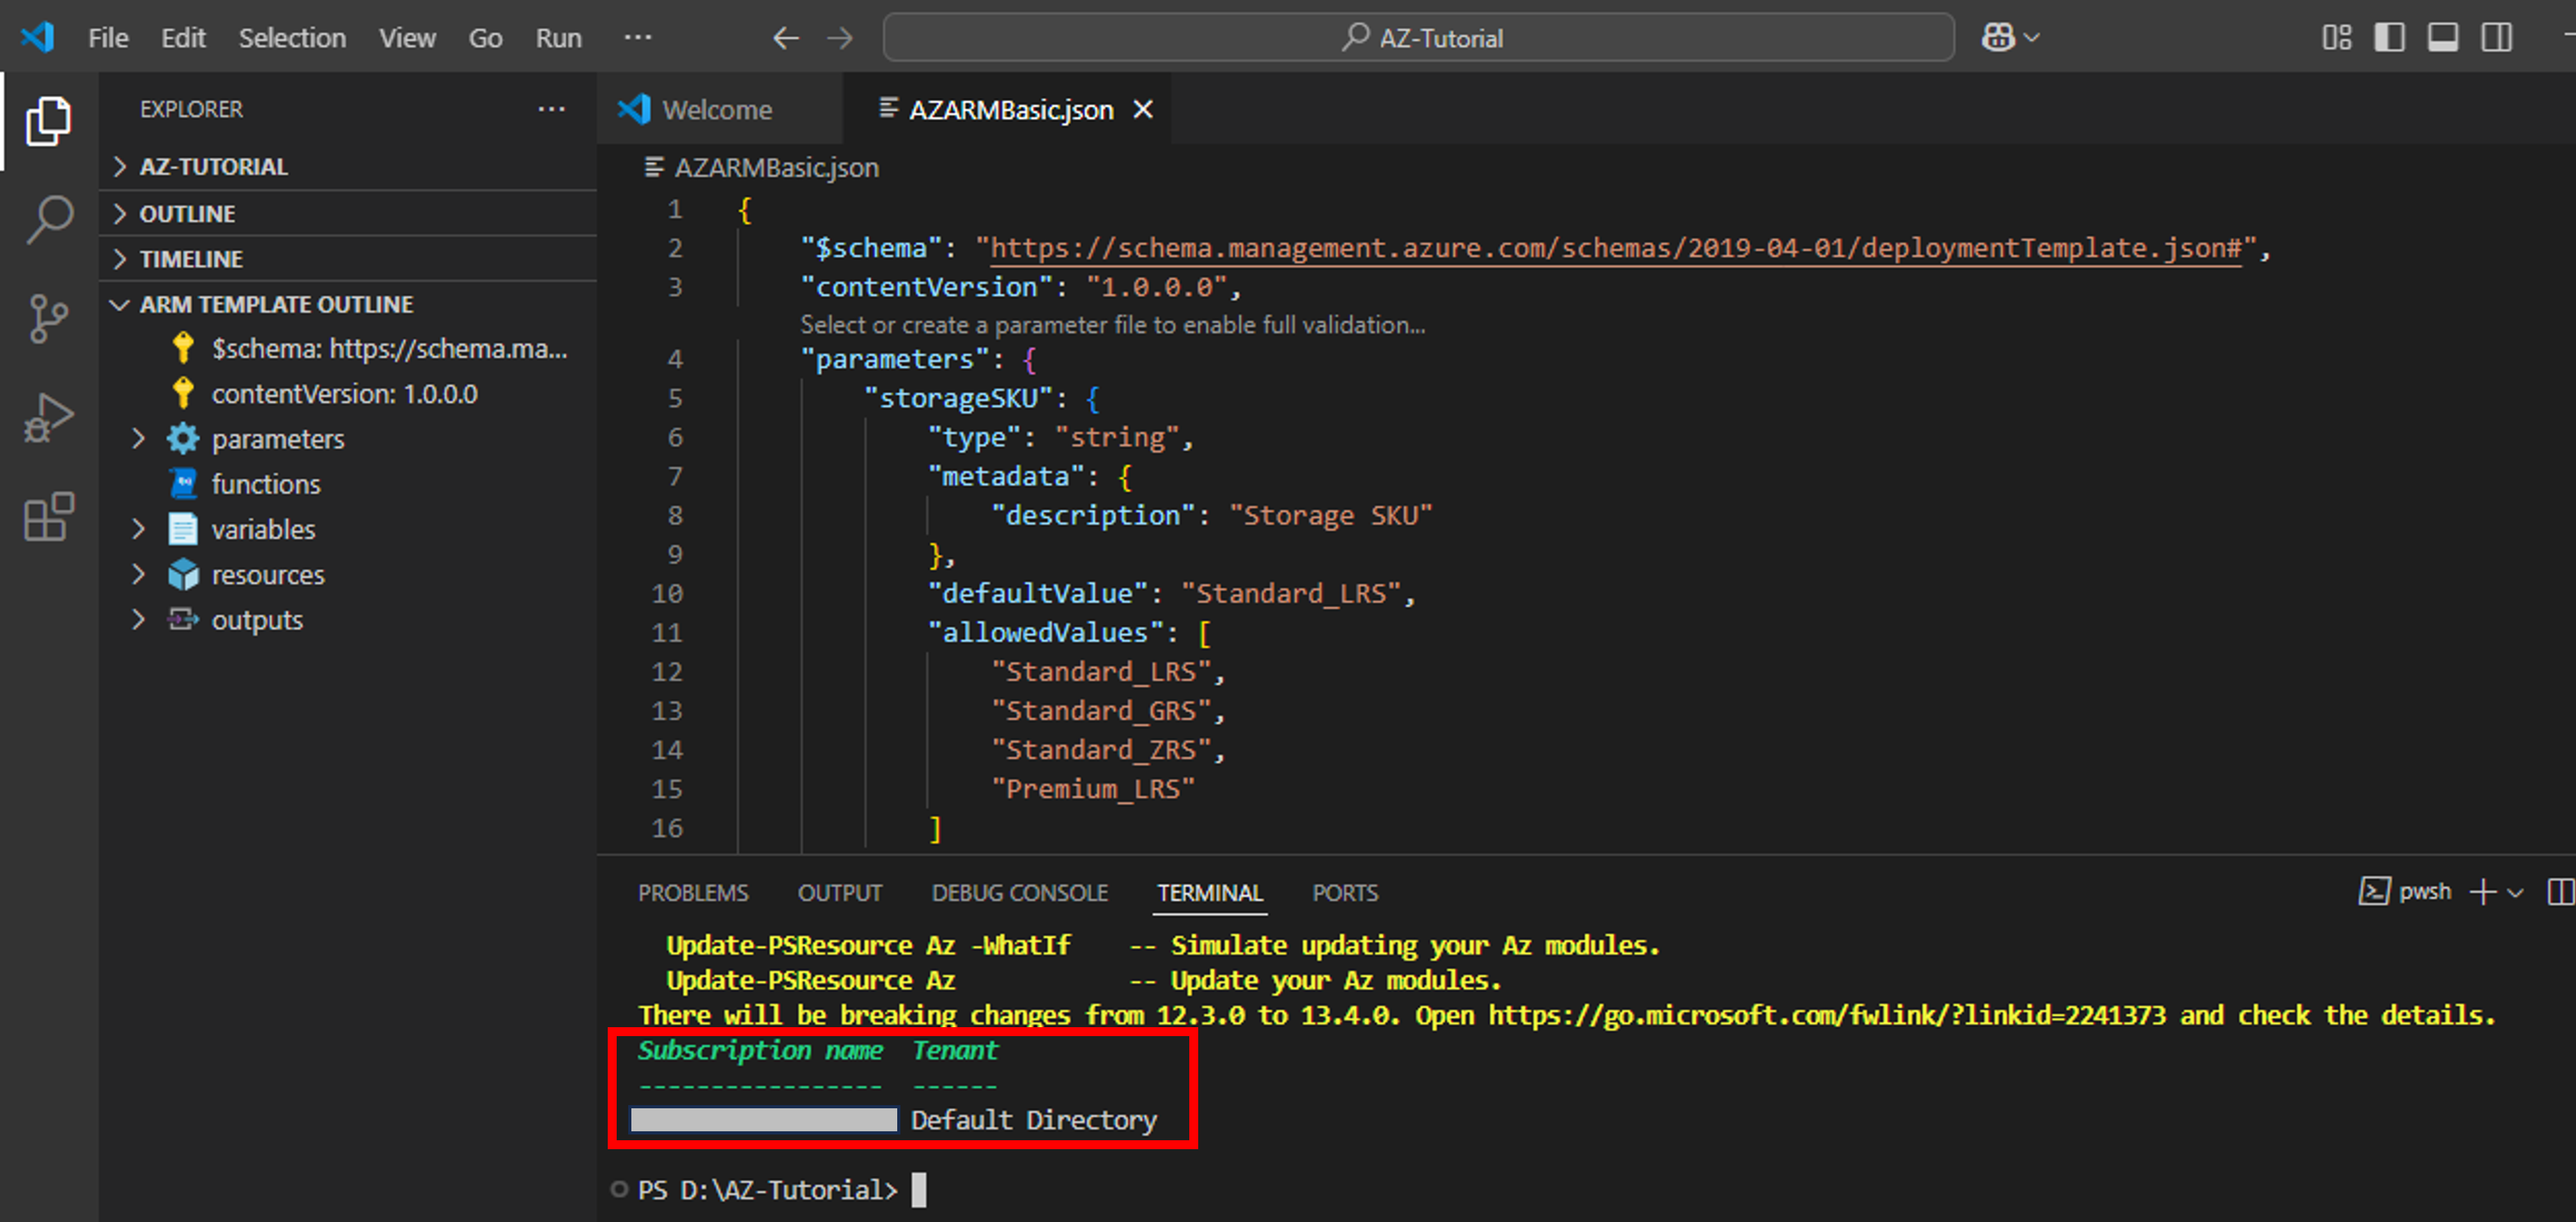
- Return to VS Code. You will get details of your subscription and Tenant in Terminal window


Set Default Subscription
Next, you need to set default subscription for your Powershell commands by following below steps:
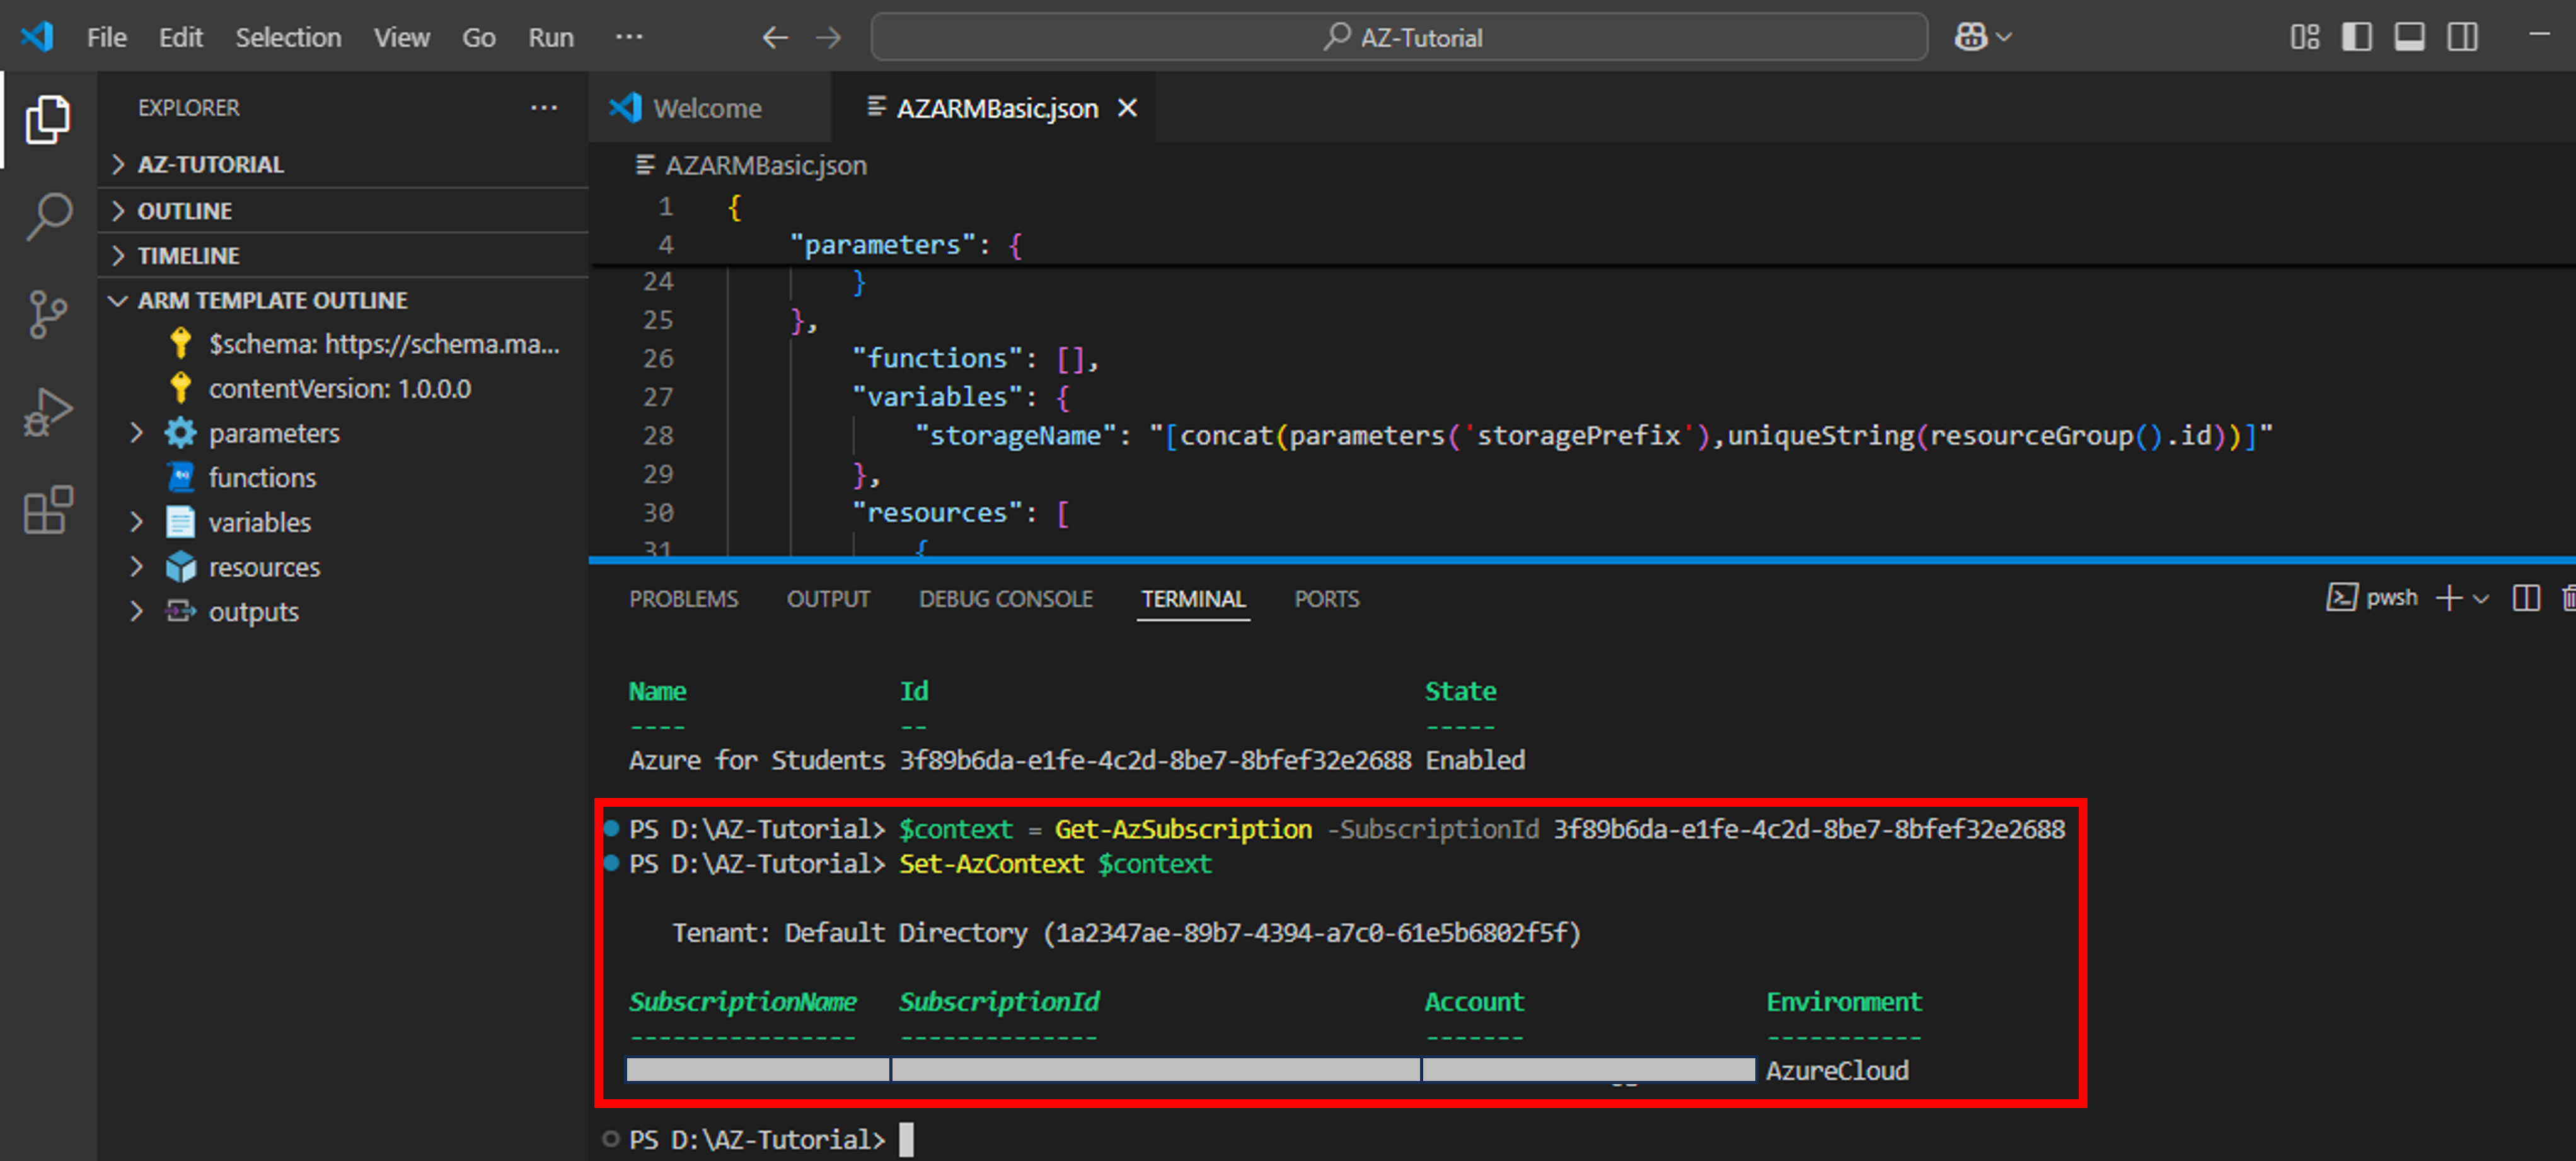
- Run below command to obtain your subscription(s) and their ID(s). Copy Subscription ID from the output
Get-Azsubscription - Run the following command by replacing subscription ID with the one you copied in previous step. Note that $ sign is used to define Powershell environment variables.
$context = Get-AzSubscription -SubscriptionId {Your subscription ID}
Set-AzContext $context
This commands sets your subscription as default subscription.
Create Resource Group
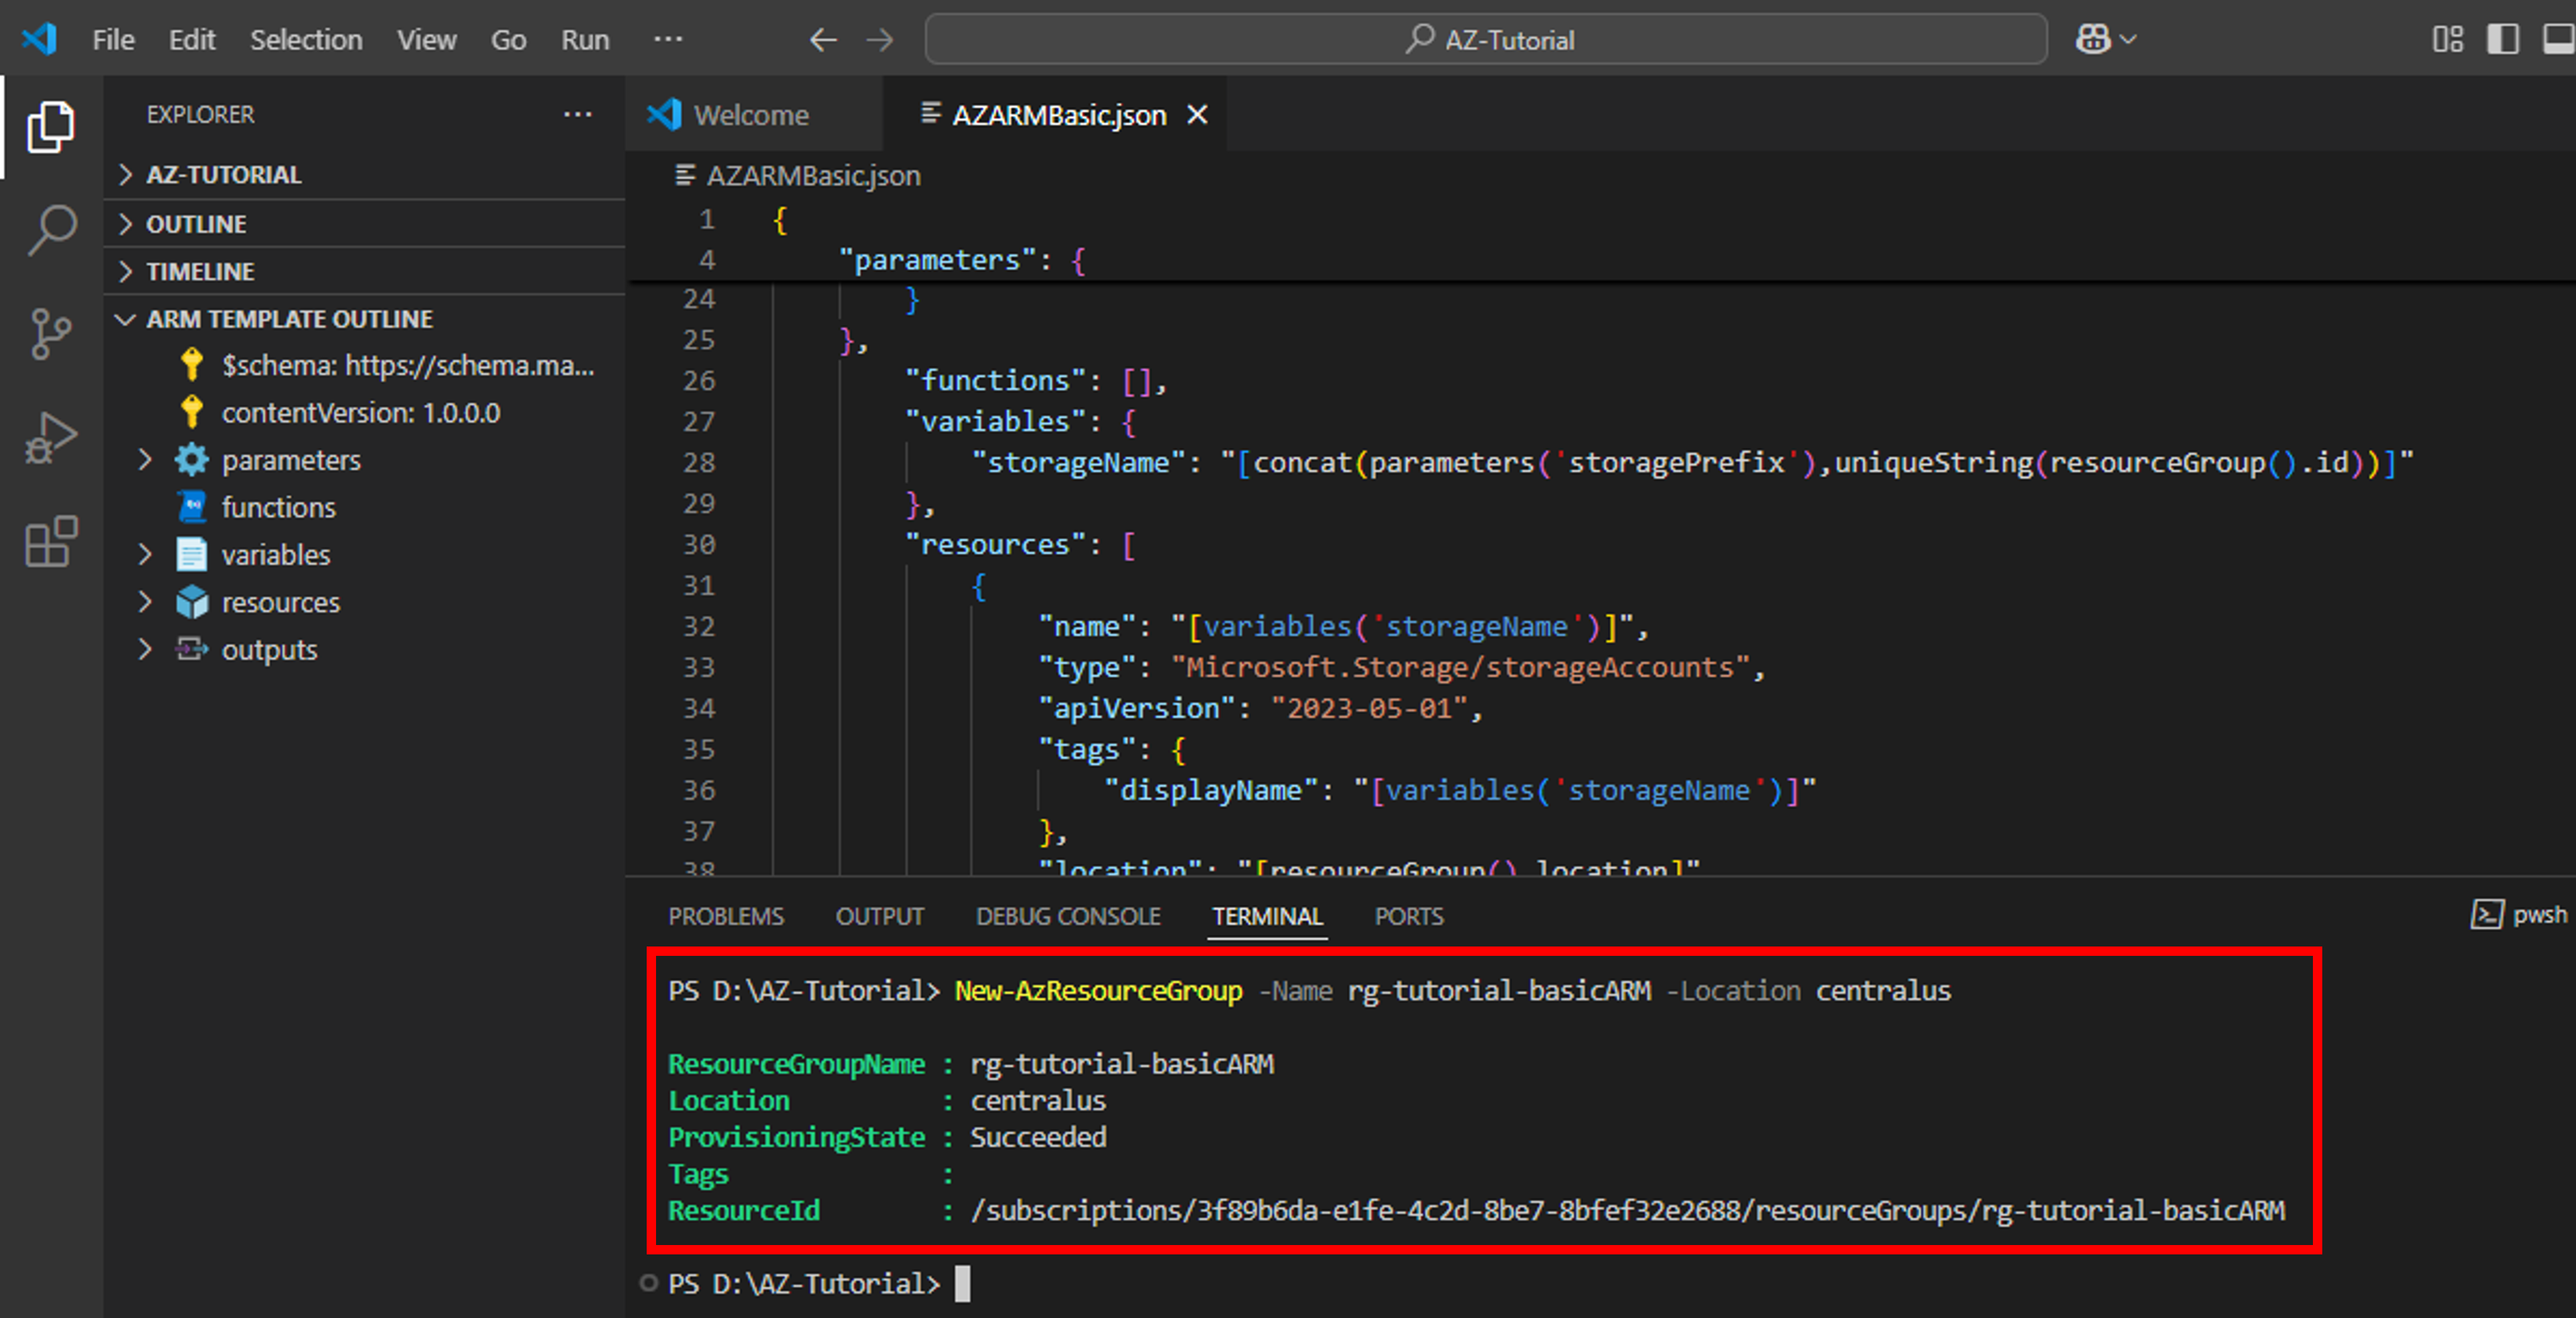
- Next, you need to create a resource group for grouping your resources. Type New-AzResourceGroup -Name rg-tutorial-basicARM -Location centralus to create a new resource group in Central US region (you can choose any location of your choice).

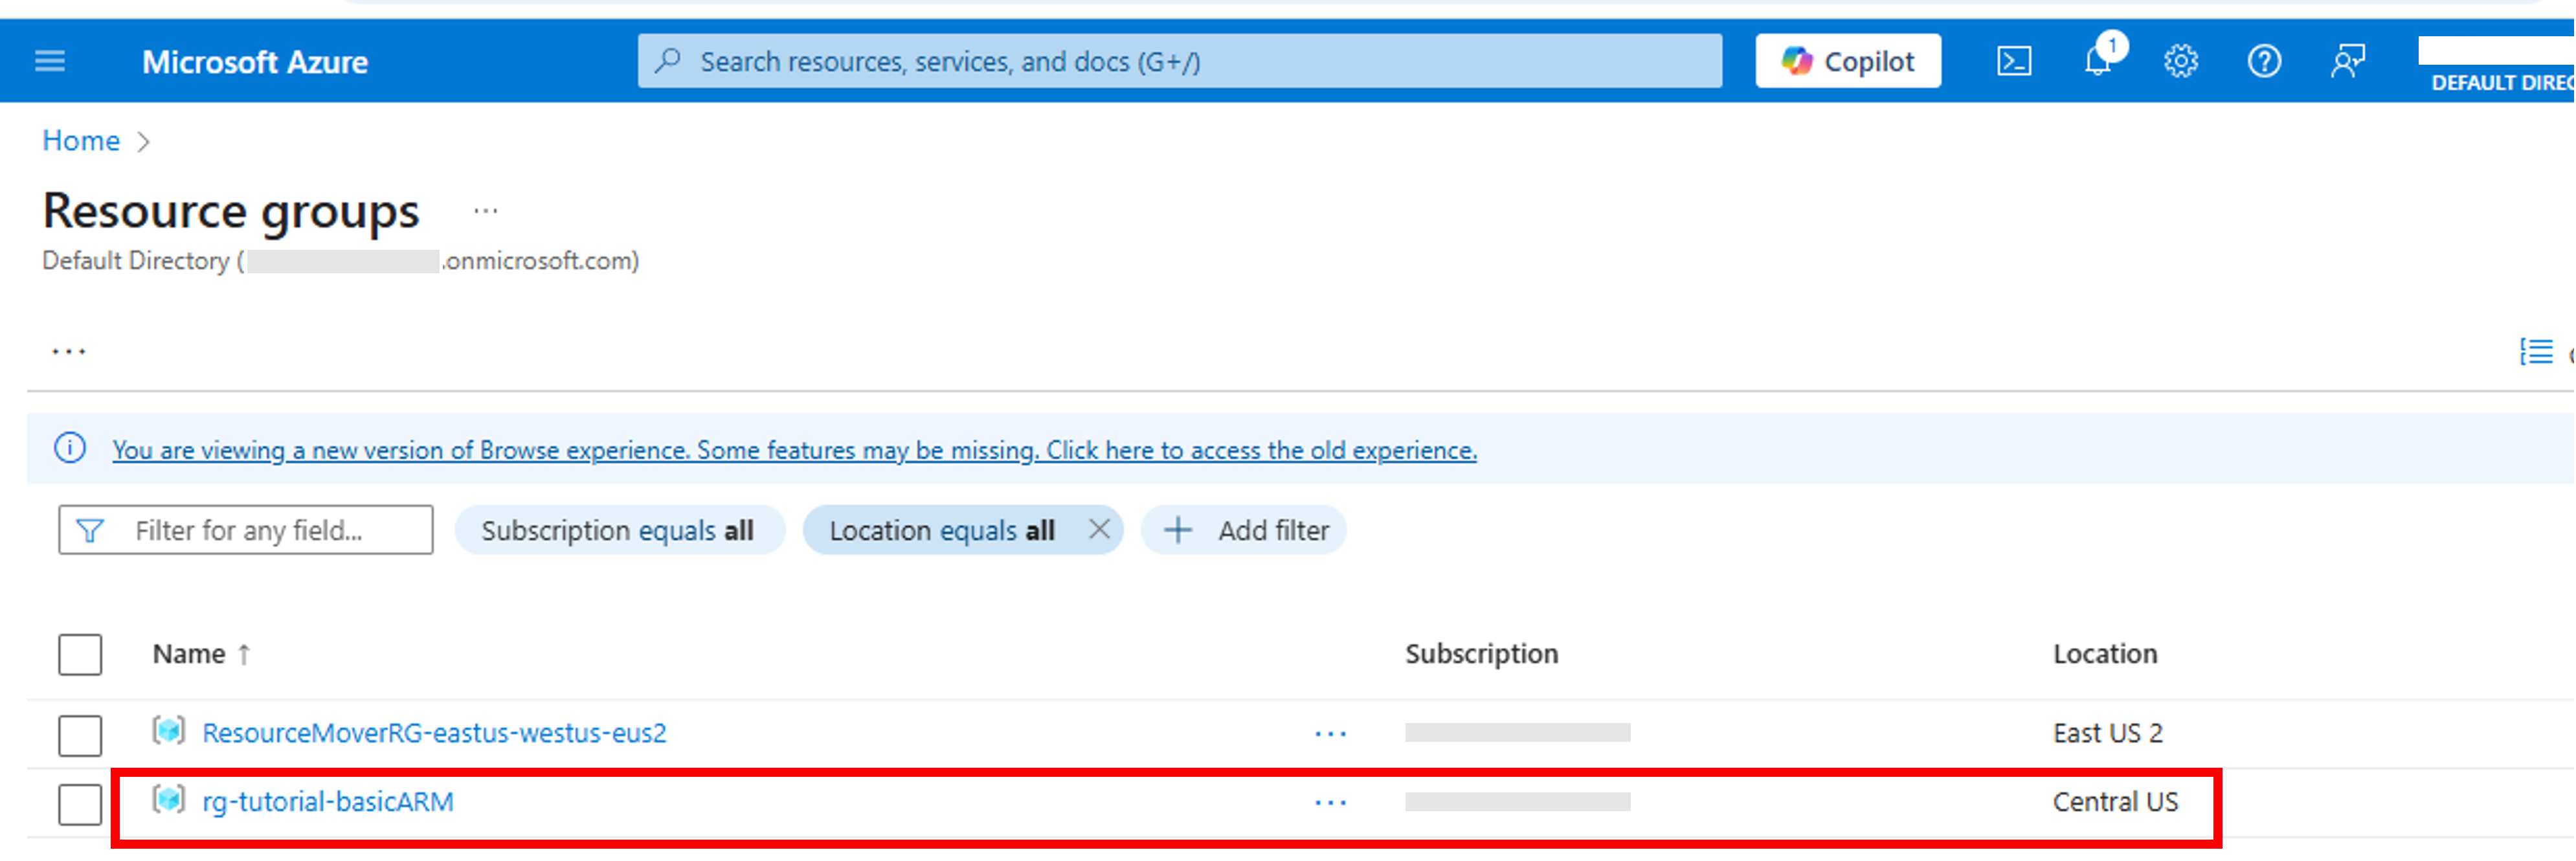
- Login in to your Azure account via Azure Portal (https://portal.azure.com/). You can find your newly created resource group by searching Resource Groups and then clicking rg-tutorial-basicARM resource group.

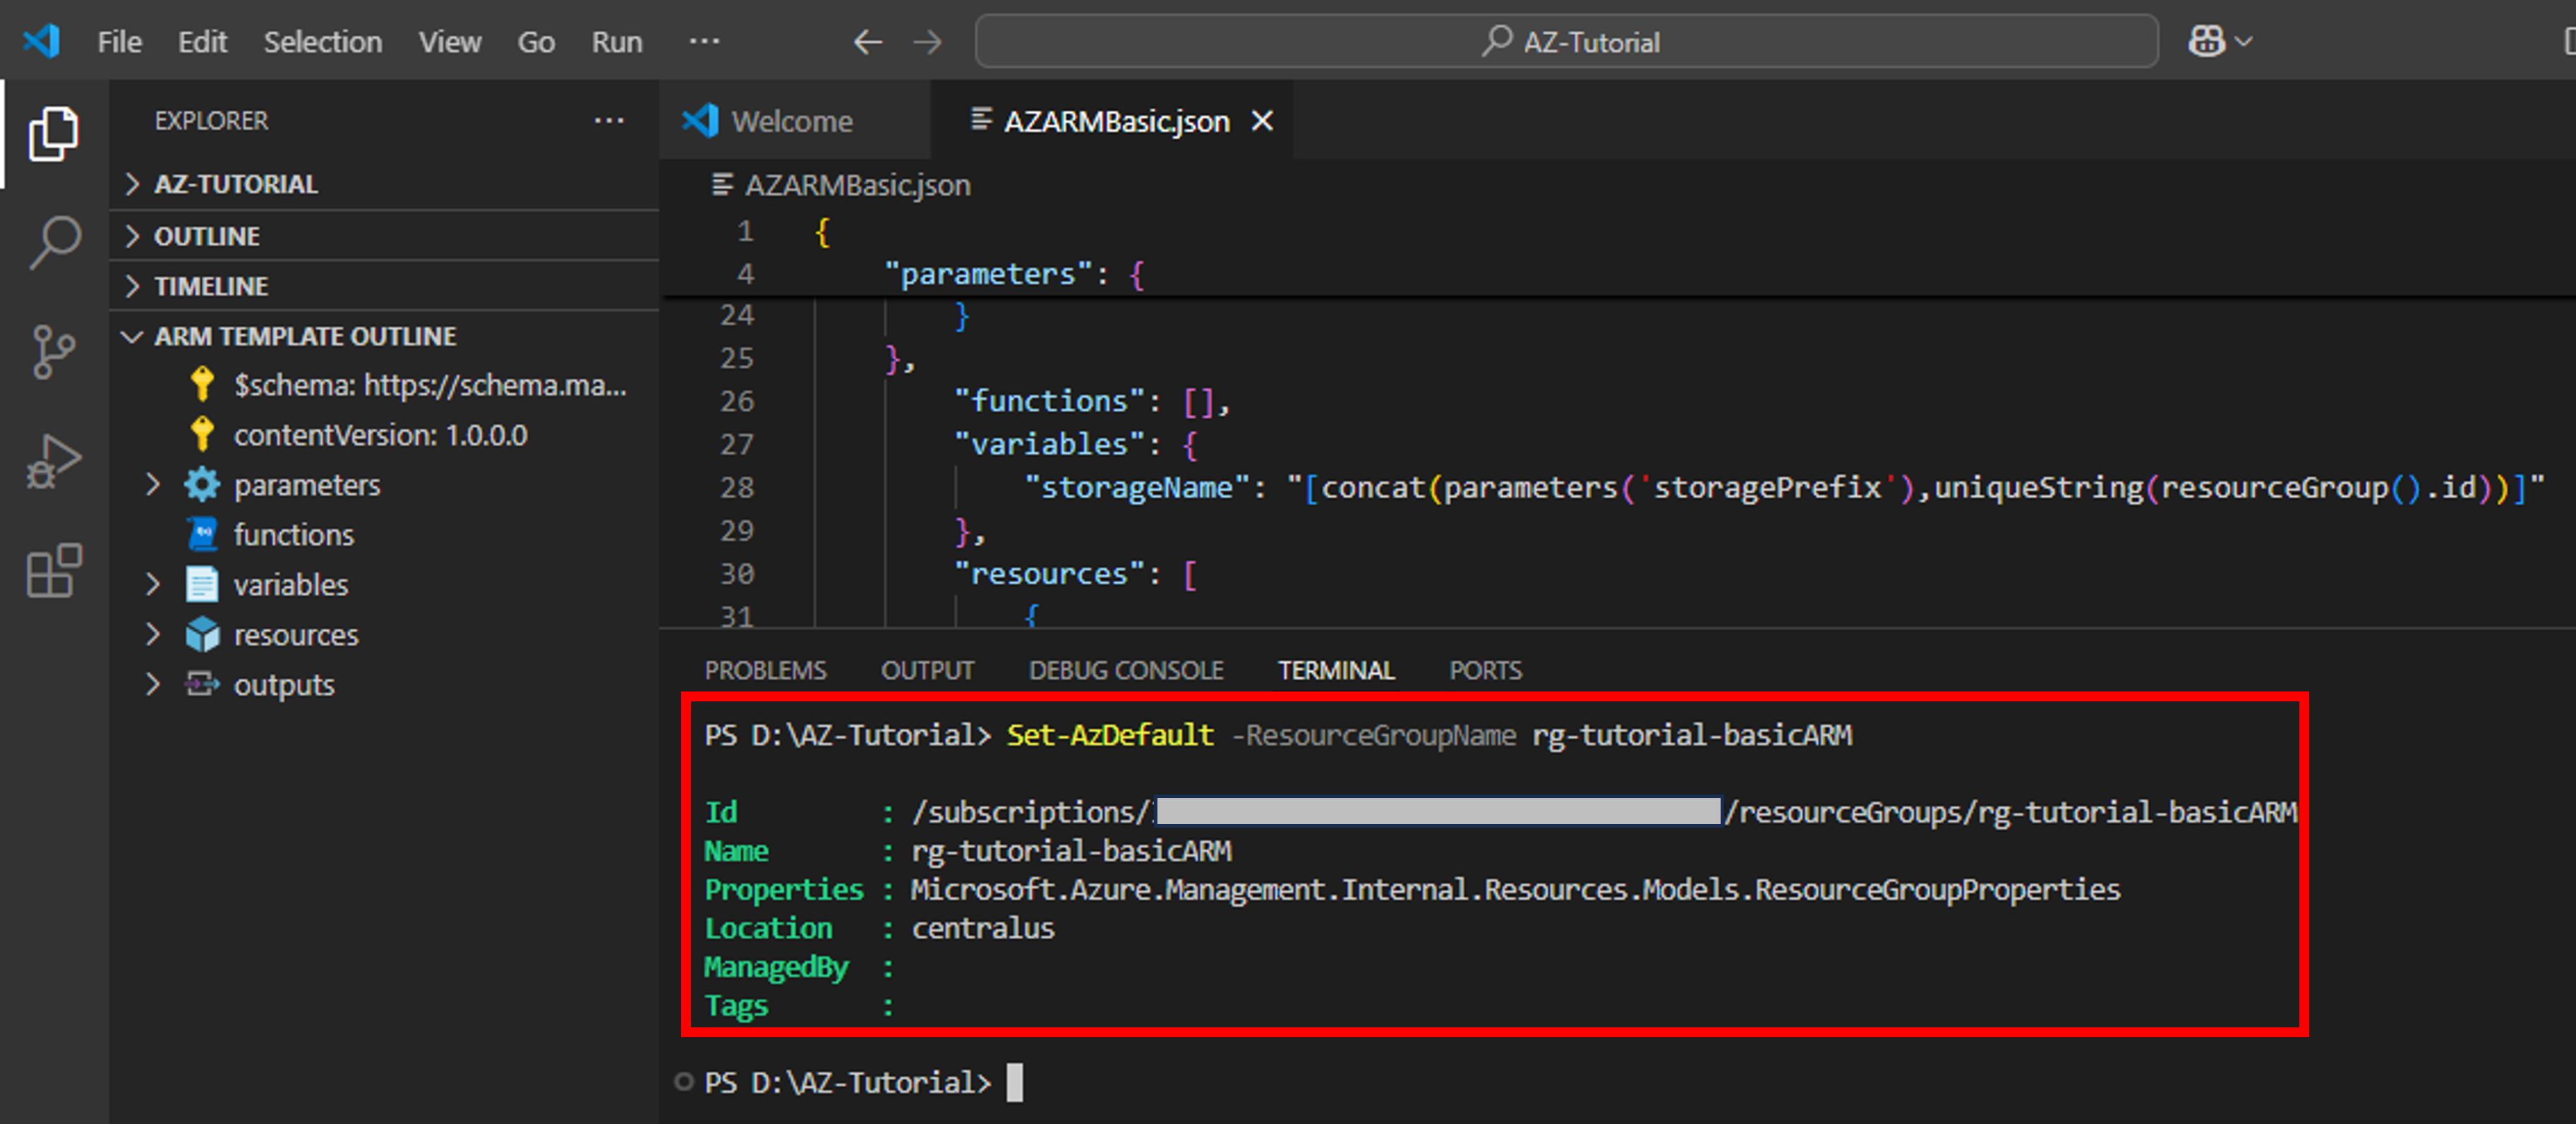
- Next, run following command to set this resource group as default resource group.
Set-AzDefault -ResourceGroupName rg-tutorial-basicARM
Deploy the template to Azure
Run following command to create three environment variables.
$templateFile="AZARMBasic.json"
$todayDate=Get-Date -Format “MM-dd-yyyy”
$deploymentName=”AZARMBasic-“+”$todayDate”
$templateFile is used to contain path to the JSON template file.
$todayDate is used to store current date.
$deploymentName is used to assign a name to the deployment. This is created by appending template file name and current date.
Now, run following command to deploy the template using ResourceGroup deployment scope:
New-AzResourceGroupDeployment `
-Name $deploymentName `
-TemplateFile $templateFile `
-storageSKU “Standard_LRS” `
-storagePrefix “armbasictut”
Note: Backtick or Tilde (‘) is a line continuation character in Powershell and used to split a long command across multiple lines.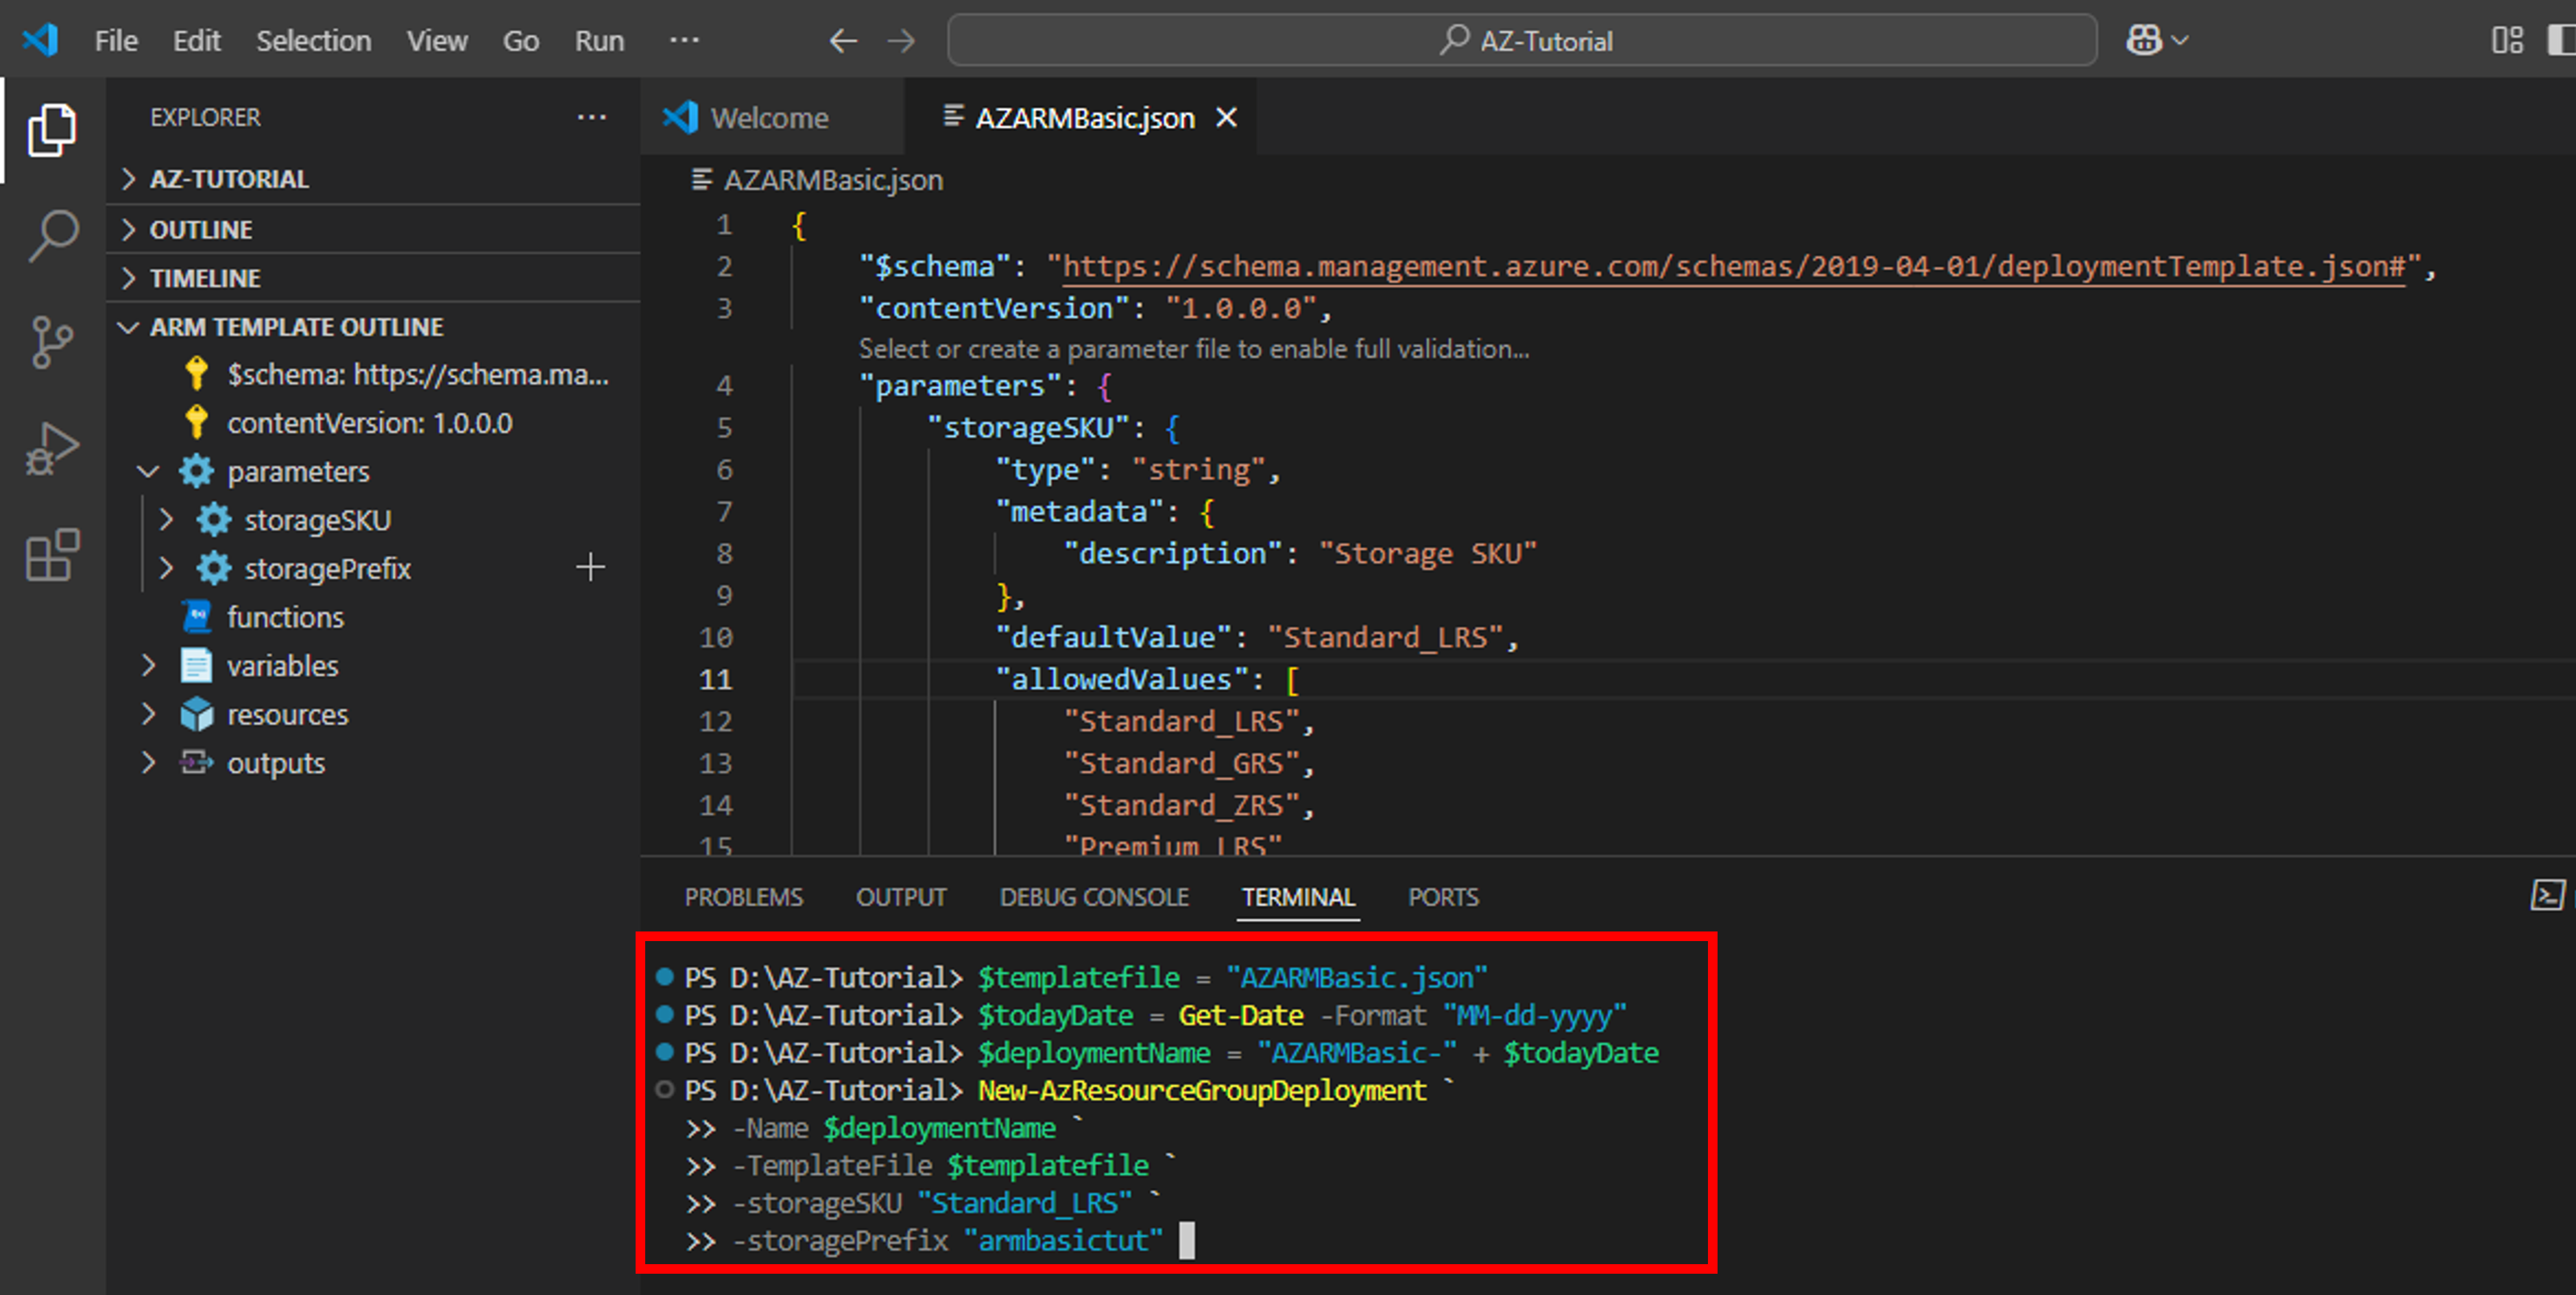
Template Deployment Result
Voila! Our ARM template is successfully deployed. You can notice the ProvisioningState: Succeeded in below snap. A new Output with the name storageEndPoint also successfully returns endpoints of the newly created storage account.
Now let’s switch to Azure Portal to verify that our ARM template is successfully deployed. Go to ResourceGroups -> rg-tutorial-basicARM. Click on the rg-tutorial-basicARM resource group. Then click on Deployments under Settings. You will notice that a new deployment is created.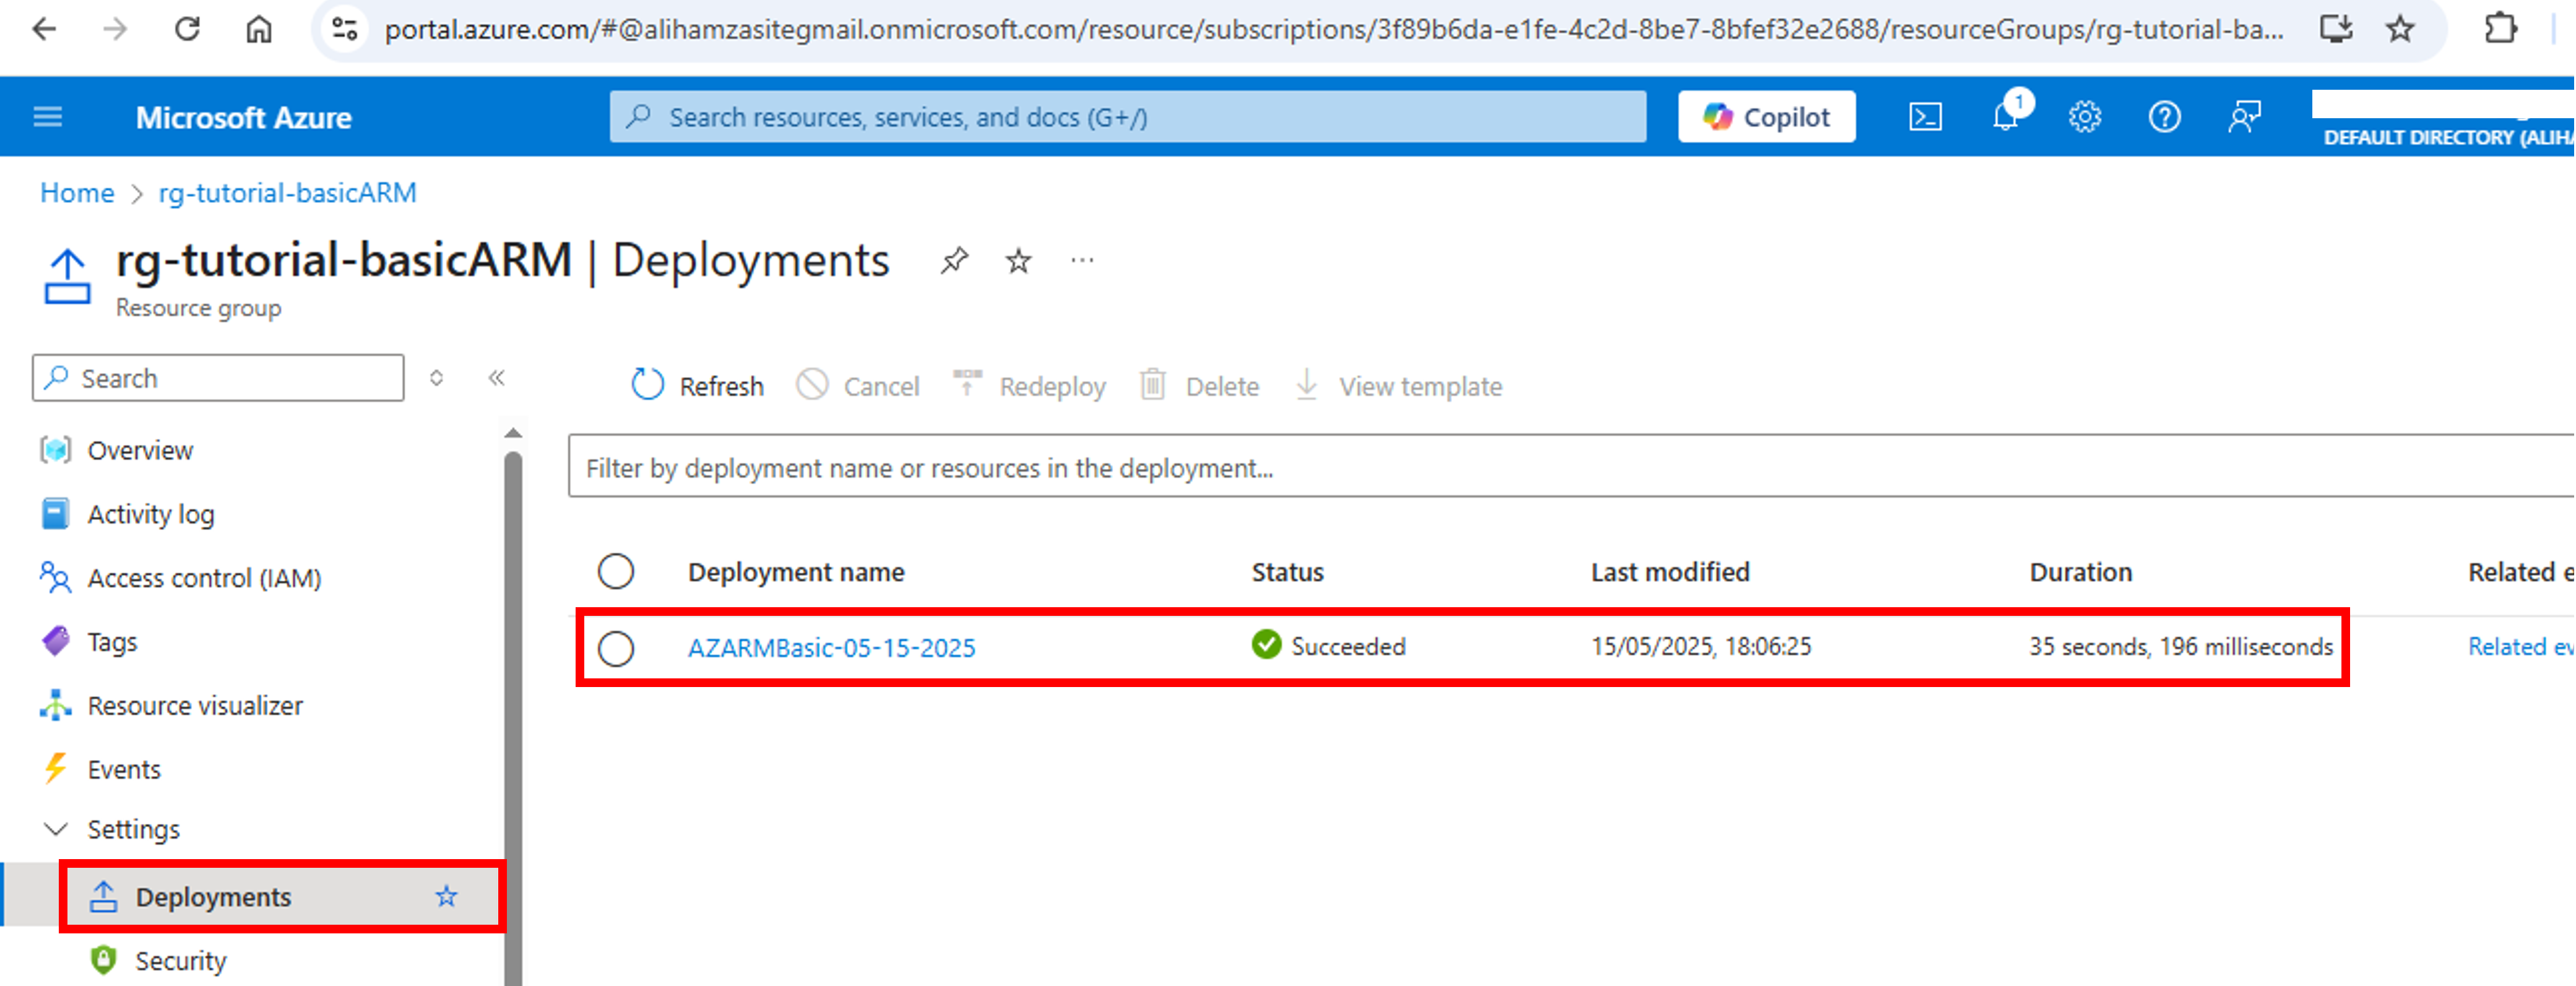
Now click on Overview under the same resource group to verify the newly created storage account. You can spot a new storage account with the name armbasictutgorbdgmqqlba6 within the resource group.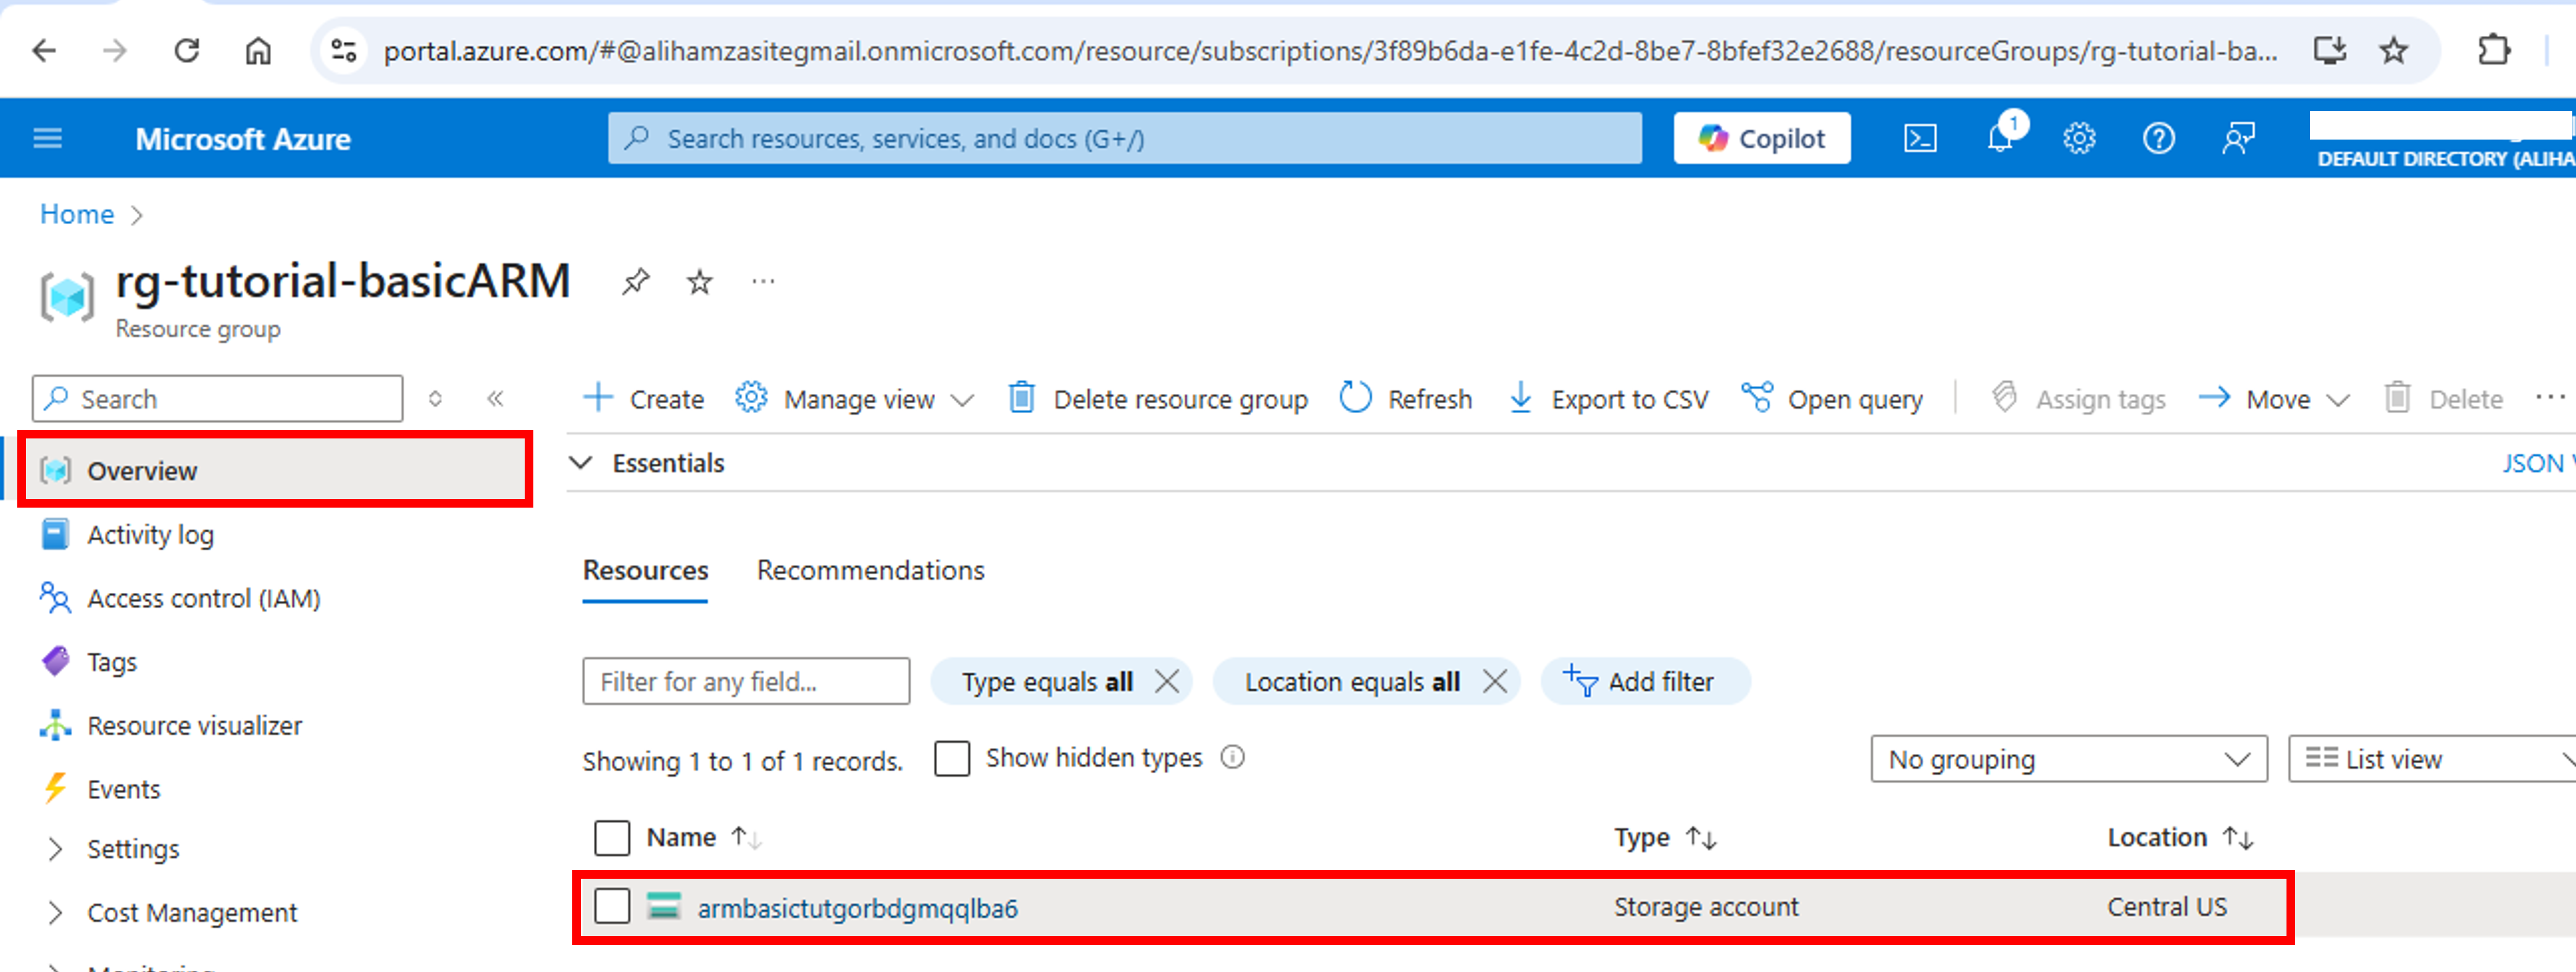
Next, click on the storage account. You will observe that it has the same properties as defined by us in ARM template.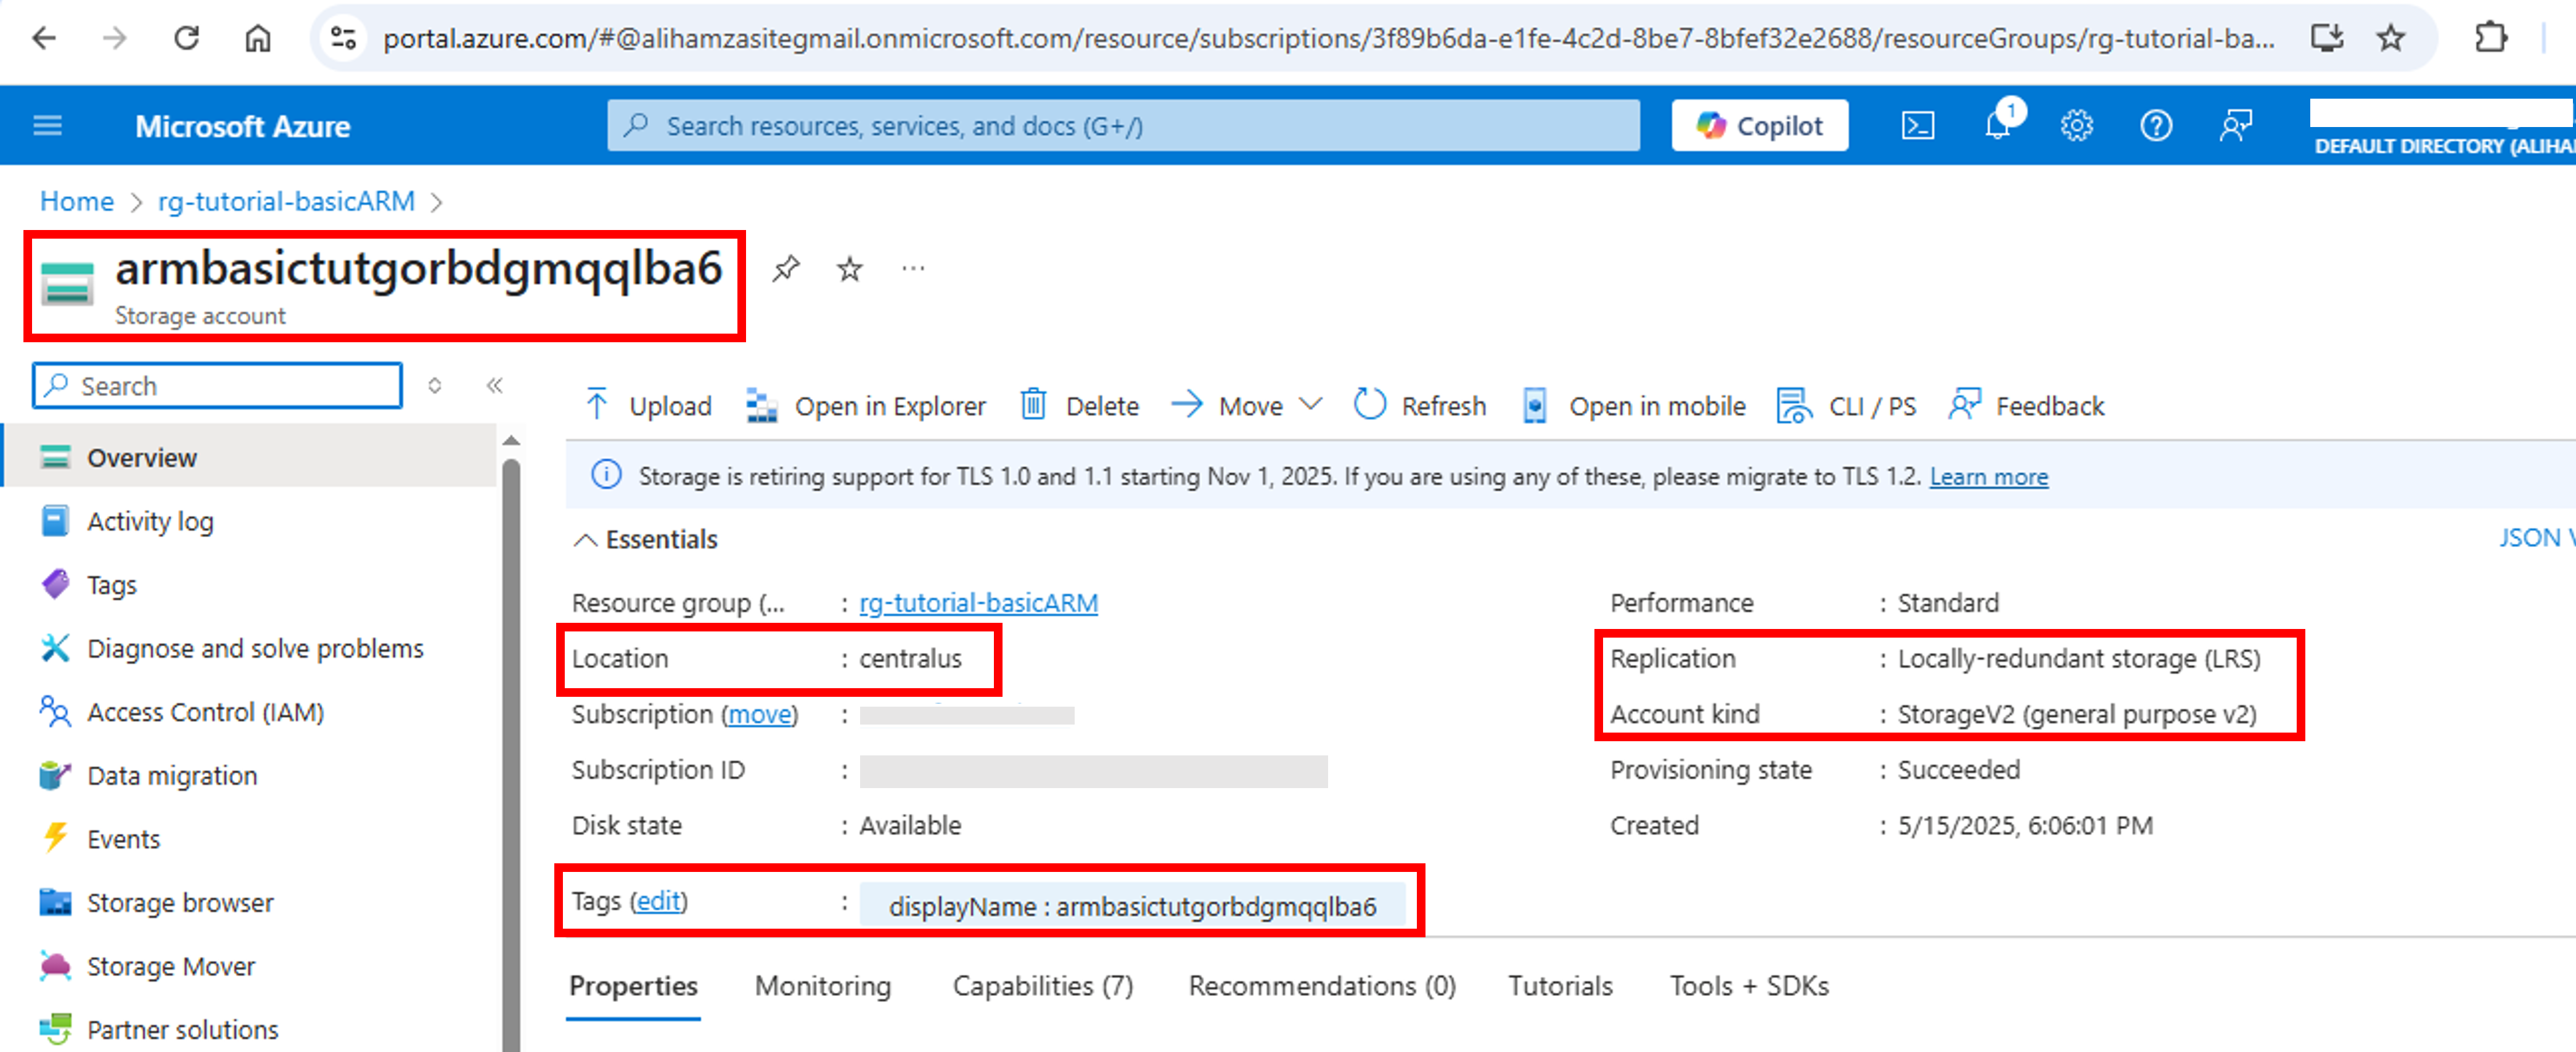
Conclusion
Azure Resource Manager template is a great tool for defining infrastructure as code on Azure Cloud. Its rich feature set and ease of integration with CI/CD tools makes it a great choice for writing, deploying and managing infrastructure code in an efficient way.
I am really impressed with your writing skills and
also with the layout on your weblog. Is this a paid theme or
did you modify it yourself? Anyway keep up the excellent quality writing, it’s rare to see
a nice blog like this one these days.
Thank you for your compliments. I am happy that you find it useful and liked the theme. I have modified the theme myself. Keep visiting for future blogs.
I am genuinely pleased to read this weblog posts which carries lots of useful information, thanks
for providing these kinds of data.
Thank you